vue 源码分析
本文将从几个方面入手一步步带大家解读vue源码,对应vue源码版本v2.6.11。
深入响应式原理
Vue 最独特的特性之一,是其非侵入性的响应式系统。数据模型仅仅是普通的 JavaScript 对象。而当你修改它们时,视图会进行更新。这使得状态管理非常简单直接,不过理解其工作原理同样重要,这样你可以避开一些常见的问题。
双向数据绑定
MVVM中,M 即 model,指的是模型,也就是数据;V 即view,指的是视图,也就是页面展现的部分。
双向数据绑定大概概括为:每当数据有变更时,会进行渲染,从而更新视图,使得视图与数据保持一致(model到view层);而另一方面,页面也会通过用户的交互,产生状态、数据的变化,这个时候,这时需要将视图对数据的更新同步到数据(view到model层)。
不同的前端 MV* 框架对于这种 Model 和 View 间的数据同步有不同的处理,如: 脏值检查(angular.js) 数据劫持 + 观察者者模式(Vue)
Vue的数据响应式原理其实就是实现数据到视图更新原理,而视图到数据的更新,其实就是此基础上给可表单元素(input等)添加了change等事件监听,来动态修改model和 view。
Vue 采用数据劫持结合观察者模式的方式来实现数据的响应式,通过Object.defineProperty来劫持数据的setter,getter,在数据变动时发布消息给订阅者,订阅者收到消息后进行相应的处理。
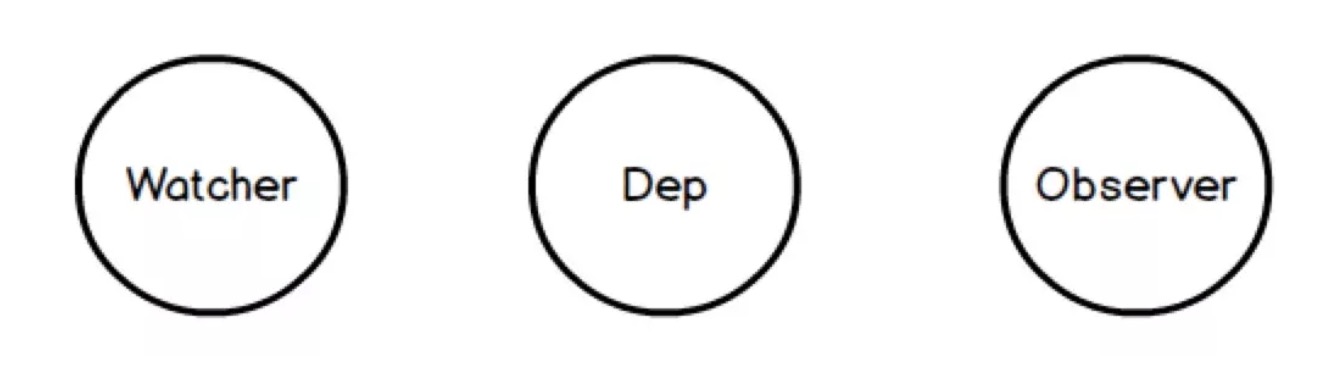
响应式更新主要涉及到Watcher,Dep,Observer这几个主要类。
vue中的观察者模式:第一步当然是通过 observer 进行数据劫持,然后在需要订阅的地方(如:模版编译),添加观察者(watcher),并立刻通过取值操作触发指定属性的 getter 方法,从而将观察者添加进 Dep (利用了闭包的特性,进行依赖收集),然后在 Setter 触发的时候,进行 notify,通知给所有观察者并进行相应的 update。
Vue实例初始化
从Vue的生命周期可知,首先进行init初始化操作,这部分代码在instance/init.js中。
src/core/instance/init.js
    initLifecycle(vm) // vm生命周期相关变量初始化操作
    initEvents(vm) // vm事件相关初始化
    initRender(vm) // 模板解析相关初始化
    callHook(vm, 'beforeCreate') // 调用beforeCreate钩子函数
    initInjections(vm) // resolve injections before data/props
    initState(vm) // vm状态初始化(重点在这里)
    initProvide(vm) // resolve provide after data/props
    callHook(vm, 'created') // 调用created钩子函数
上述源码中的initState(vm)是要研究的重点,里面实现了props,methods,data,computed,watch的初始化操作。源码位置在instance/state.js
src/core/instance/state.js
export function initState (vm: Component) {
  vm._watchers = []
  const opts = vm.$options
  if (opts.props) initProps(vm, opts.props)
  if (opts.methods) initMethods(vm, opts.methods)
  if (opts.data) {
    initData(vm) // 对vm的data进行初始化,主要是通过Observer设置对应getter/setter方法
  } else {
    observe(vm._data = {}, true /* asRootData */) // 如果没有data, _data效果一样, 只是没做代理
  }
  if (opts.computed) initComputed(vm, opts.computed)
  if (opts.watch && opts.watch !== nativeWatch) {
    initWatch(vm, opts.watch)
  }
}
initData
initData做了两件事: proxy, observe。
src/core/instance/state.js
function initData (vm: Component) {
  let data = vm.$options.data
  data = vm._data = typeof data === 'function' // 如果data是函数, 用vm作为this执行函数的结果作为data
    ? getData(data, vm)
    : data || {}
  if (!isPlainObject(data)) { // 过滤乱搞, data只接受对象, 如果乱搞会报警并且把data认为是空对象
    data = {}
    process.env.NODE_ENV !== 'production' && warn(
      'data functions should return an object:\n' +
      'https://vuejs.org/v2/guide/components.html#data-Must-Be-a-Function',
      vm
    )
  }
  // proxy data on instance
  const keys = Object.keys(data)
  const props = vm.$options.props
  const methods = vm.$options.methods
  let i = keys.length
  while (i--) {
    const key = keys[i]
    if (process.env.NODE_ENV !== 'production') {
      if (methods && hasOwn(methods, key)) { // 判断是否和methods重名
        warn(
          `Method "${key}" has already been defined as a data property.`,
          vm
        )
      }
    }
    if (props && hasOwn(props, key)) { // 判断是否和props重名
      process.env.NODE_ENV !== 'production' && warn(
        `The data property "${key}" is already declared as a prop. ` +
        `Use prop default value instead.`,
        vm
      )
    } else if (!isReserved(key)) { // 判断key是否以_或$开头
      proxy(vm, `_data`, key) // 代理data
    }
  }
  // observe data
  observe(data, true /* asRootData */)
}
我们来看一下proxy是干嘛的,其实就是把vm.key的setter和getter都代理到vm._data.key, 效果就是vm.a实际实际是vm._data.a, 设置vm.a也是设置vm._data.a.:
const sharedPropertyDefinition = {
  enumerable: true,
  configurable: true,
  get: noop,
  set: noop
}

// 在initData中调用: proxy(vm, `_data`, key)
// target: vm, sourceKey: _data, key: key. 这里的key为遍历data的key
// 举例: data为{a: 'a value', b: 'b value'}
// 那么这里执行的target: vm, sourceKey: _data, key: a
export function proxy (target: Object, sourceKey: string, key: string) {
  sharedPropertyDefinition.get = function proxyGetter () {
    return this[sourceKey][key] // getter: vm._data.a
  }
  sharedPropertyDefinition.set = function proxySetter (val) {
    this[sourceKey][key] = val // setter: vm._data.a = val
  }
  Object.defineProperty(target, key, sharedPropertyDefinition) // 用Object.defineProperty来设置getter, setter
}
代理完成之后调用了observe(data, true),来实现数据的响应式。
observe方法其实是一个单例的入口, 最后行为是创建一个observe对象放到observe目标的__ob__属性里, 代码如下:
src/core/observer/index.js
/**
 * Attempt to create an observer instance for a value,
 * returns the new observer if successfully observed,
 * or the existing observer if the value already has one.
 */
export function observe (value: any, asRootData: ?boolean): Observer | void {
  if (!isObject(value) || value instanceof VNode) {
    return
  }
  let ob: Observer | void
  if (hasOwn(value, '__ob__') && value.__ob__ instanceof Observer) {
    ob = value.__ob__
  } else if (
    shouldObserve &&
    !isServerRendering() &&
    (Array.isArray(value) || isPlainObject(value)) &&
    Object.isExtensible(value) &&
    !value._isVue
  ) {
    //如果数据没有被observe过,且数据是array或object类型,那么将数据转化为observer类型,所以observer类接收的是对象和数组。
    ob = new Observer(value) // 重点在这里,响应式的核心所在
  }
  //如果是RootData,即咱们在新建Vue实例时,传到data里的值,只有RootData在每次observe的时候,会进行计数。
  if (asRootData && ob) {
    ob.vmCount++
  }
  return ob
}
我在这里说一下vmCount属性:vmCount属性是用来记录该实例被创建的次数,我们看下面的代码,调用了两次my-component组件,这个时候vmCount为2.
<div>
    <div id="example">
      <my-component></my-component>
      <my-component></my-component>
    </div>
</div>
    <script src="./vue.js"></script>
    <script>
    var data = { counter: 1 }
    Vue.component('my-component', {
      template: '<div></div>',
      data: function () {
        return data
      }
    })
    // 创建根实例
    var app2 = new Vue({
      el: '#example'
    })
</script>
效果:

这里重点关注new Observer(value),这是该方法的核心所在,通过Observer类将vue的data变成响应式。下面就具体看看Observer类。
Observer
首先看看该类的构造方法,Observer 将每个目标对象的键值(即data中的数据)转换成getter/setter形式,用于进行依赖收集和通过依赖通知更新。
src/core/observer/index.js
export class Observer {
  value: any;
  dep: Dep;
  vmCount: number; // number of vms that have this object as root $data

  constructor (value: any) {
    this.value = value // 保存值
    this.dep = new Dep() // dep对象
    this.vmCount = 0
    //def是定义的函数,使用Object.defineProperty()给value添加不可枚举的属性,__ob__是一个对象被observe的标志。
    def(value, '__ob__', this) // 自己的副本, 放到__ob__属性下, 作为单例依据的缓存
    if (Array.isArray(value)) { // 判断是否为数组, 如果是数组的话劫持一些数组的方法, 在调用这些方法的时候进行通知.
      if (hasProto) {
        protoAugment(value, arrayMethods)
      } else {
        copyAugment(value, arrayMethods, arrayKeys)
      }
      this.observeArray(value) // 遍历数组, 继续监察数组的每个元素
    } else {
      // 对于对象,遍历对象,并用Object.defineProperty转化为getter/setter,便于监控数据的get和set
      this.walk(value)
    }
  }

  /**
   * Walk through all properties and convert them into
   * getter/setters. This method should only be called when
   * value type is Object.
   */
  //遍历对象,调用defineReactive将每个属性转化为getter/setter
  walk (obj: Object) {
    const keys = Object.keys(obj)
    for (let i = 0; i < keys.length; i++) {
      defineReactive(obj, keys[i])
    }
  }

  /**
   * Observe a list of Array items.
   */
  //observe每个数组元素(observe会生成Observer类)
  observeArray (items: Array<any>) {
    for (let i = 0, l = items.length; i < l; i++) {
      observe(items[i])
    }
  }
}
做了几件事:
-
建立内部Dep对象。
-
把目标的
__ob__属性赋值成Observe对象。 -
如果目标是数组, 进行方法的劫持。
-
如果是数组就observeArray, 对象walk。
下面我们先看一下defineReactive。
defineReactive
/**
 * Define a reactive property on an Object.
 */
export function defineReactive (
  obj: Object,
  key: string,
  val: any,
  customSetter?: ?Function,
  shallow?: boolean
) {
  // dep 维护着一个subs列表,保存依赖与当前数据(此时是当前数据是counter)的观察者(或者叫订阅者)。观察者即是Watcher实例。
  const dep = new Dep()

  const property = Object.getOwnPropertyDescriptor(obj, key)
  if (property && property.configurable === false) { // 判断当前key的操作权限
    return
  }

  // cater for pre-defined getter/setters
  // 获取对象本来的getter setter
  const getter = property && property.get
  const setter = property && property.set
  if ((!getter || setter) && arguments.length === 2) {
    val = obj[key]
  }

  //注意下面这行代码,设置getter/setter之前,会observe该属性对应的值(val)
  let childOb = !shallow && observe(val)
  Object.defineProperty(obj, key, {
    enumerable: true,
    configurable: true,
    get: function reactiveGetter () {
      //获取属性的值,如果这个属性在转化之前定义过getter,那么调用该getter得到value的值,否则直接返回val。
      const value = getter ? getter.call(obj) : val
      // 调用get的情况有两种,一是Watcher收集依赖的时候(此时Dep收集订阅者),二是模板或js代码里用到这个值,这个时候是不需要收集依赖的,只要返回值就可以了。
      if (Dep.target) {
        dep.depend()
        if (childOb) {
          childOb.dep.depend()
          //如果是数组,那么数组中的每个值都添加到依赖列表里
          if (Array.isArray(value)) {
            dependArray(value)
          }
        }
      }
      // 依赖收集完后返回值
      return value
    },
    set: function reactiveSetter (newVal) {
      const value = getter ? getter.call(obj) : val // 如果本身有getter, 先调用
      /* eslint-disable no-self-compare */
      // 如果值不变就不去做通知了 (或者值为NaN)
      if (newVal === value || (newVal !== newVal && value !== value)) {
        return
      }
      /* eslint-enable no-self-compare */
      if (process.env.NODE_ENV !== 'production' && customSetter) {
        customSetter()
      }
      // #7981: for accessor properties without setter
      if (getter && !setter) return
      // 这里对数据的值进行修改
      if (setter) { // 如果本身有setter, 先调用, 没的话就直接赋值
        setter.call(obj, newVal)
      } else {
        val = newVal // 因为传入参数的时候其实是'obj[keys[i]]', 所以就等于是'obj[key] = newVal'了
      }
      //当为属性设置了新的值,是需要observe的
      childOb = !shallow && observe(newVal)
      //set的时候数据变化了,通知更新数据
      dep.notify()
    }
  })
}

/**
 * Collect dependencies on array elements when the array is touched, since
 * we cannot intercept array element access like property getters.
 */
function dependArray (value: Array<any>) {
  for (let e, i = 0, l = value.length; i < l; i++) {
    e = value[i]
    e && e.__ob__ && e.__ob__.dep.depend()
    if (Array.isArray(e)) {
      dependArray(e)
    }
  }
}
解释都在注释中了, 总结一下这个方法的做的几件重要的事:
-
建立Dep对象.
-
递归调用. 可以说很大部分代码都在递归调用, 分别在创建子observe对象, setter, getter中.
-
getter中: 调用原来的getter, 收集依赖
dep.depend(), 同样也是递归收集. -
setter中: 调用原来的setter, 并判断是否需要通知, 最后调用
dep.notify().
总的来说就是, 传入的data数据会被劫持, 在get的时候调用Dep.depend(), 在set的时候调用Dep.notify().
Vue.set 、 Vue.delete
使用Object.defineProperty定义getter/setter方法拦截数据的不足:
当对象增删的时候,是监控不到的。比如:
data={a:"a"}
这个时候如果我们设置 data.test="test" 是监控不到的。
因为在observe data的时候,会遍历已有的每个属性(比如a),添加getter/setter,而后面设置的test属性并没有机会设置getter/setter,所以检测不到变化。
同样的,删除对象属性的时候,getter/setter会跟着属性一起被删除掉,拦截不到变化。
因此,Vue官方给出了vm.$set/Vue.set和vm.$delete/Vue.delete这样的api来解决这个问题:
/**
 * Set a property on an object. Adds the new property and
 * triggers change notification if the property doesn't
 * already exist.
 */
export function set (target: Array<any> | Object, key: any, val: any): any {
  if (process.env.NODE_ENV !== 'production' &&
    (isUndef(target) || isPrimitive(target))
  ) {
    warn(`Cannot set reactive property on undefined, null, or primitive value: ${(target: any)}`)
  }
  // 对于数组的处理,调用变异方法splice,这个时候数组的Dep会发布更新消息
  if (Array.isArray(target) && isValidArrayIndex(key)) {
    target.length = Math.max(target.length, key)
    target.splice(key, 1, val)
    return val
  }
  //如果set的是对象已经有的属性,那么该属性已经有getter/setter函数了,此时直接修改即可
  if (key in target && !(key in Object.prototype)) {
    target[key] = val
    return val
  }
  const ob = (target: any).__ob__
  if (target._isVue || (ob && ob.vmCount)) {
    process.env.NODE_ENV !== 'production' && warn(
      'Avoid adding reactive properties to a Vue instance or its root $data ' +
      'at runtime - declare it upfront in the data option.'
    )
    return val
  }
  if (!ob) {
    target[key] = val
    return val
  }
  //如果是对象没有的属性,则添加getter/setter
  defineReactive(ob.value, key, val)
  //注意此处,对象的Dep会发布更新
  ob.dep.notify()
  return val
}

/**
 * Delete a property and trigger change if necessary.
 */
export function del (target: Array<any> | Object, key: any) {
  if (process.env.NODE_ENV !== 'production' &&
    (isUndef(target) || isPrimitive(target))
  ) {
    warn(`Cannot delete reactive property on undefined, null, or primitive value: ${(target: any)}`)
  }
  if (Array.isArray(target) && isValidArrayIndex(key)) {
    target.splice(key, 1)
    return
  }
  const ob = (target: any).__ob__
  if (target._isVue || (ob && ob.vmCount)) {
    process.env.NODE_ENV !== 'production' && warn(
      'Avoid deleting properties on a Vue instance or its root $data ' +
      '- just set it to null.'
    )
    return
  }
  if (!hasOwn(target, key)) {
    return
  }
  delete target[key]
  if (!ob) {
    return
  }
  ob.dep.notify()
}

export function stateMixin (Vue: Class<Component>) {
  ...
  Vue.prototype.$set = set
  Vue.prototype.$delete = del
  ...
}
上面的代码比较简单,看过注释应该就能明白,我不做过多解释。我们着重注意下这句代码:
ob.dep.notify(),对象的Dep发布更新。可是这个dep是在什么地方收集的订阅者呢?
还记得defineReactive函数里让大家注意的这句代码吗:childOb.dep.depend(),这句代码就是在收集订阅者。
仔细阅读Observer相关的代码,我们会发现,dep实例化有两种类型:
第一种: 是在defineReactive函数里,每次调用这个函数的时候都会创建一个新的Dep实例,存在于getter/setter闭包函数的作用域链上,是为对象属性服务的。在Watcher获取属性的值的时候收集订阅者,在设置属性值的时候发布更新。
第二种: 是在observe函数中,此时的dep挂在被observe的数据的__ob__属性上,他是为对象或数组服务的,在Watcher获取属性的值的时候,如果值被observe后返回observer对象(即对象和数组),那么就会在此时收集订阅者,在对象或数组新增、删除元素时调用$set、$delete等api时发布更新;
defineReactive函数的getter函数里这段代码就是在收集订阅者:
get: function reactiveGetter () {
  var value = getter ? getter.call(obj) : val;
  if (Dep.target) {
    dep.depend();

    if (childOb) {
      //注意这里,此处的dep就是在执行var childOb = observe(val)时产生的,是用来收集childOb的订阅者的
      childOb.dep.depend()
      //如果是数组,那么数组中的每个值都添加到依赖列表里
      if (Array.isArray(value)) {
        dependArray(value)
      }
    }
  }
}
实例分析
我们来看个例子:
<div id="example">
  <div></div>
  <div></div>
  <div></div>
  <div></div>
</div>

<script>
// 我们的数据对象
var data = {
  key1: {
    key2: 2,
    key3: {
      key4: 4,
      key5: [5],
    },
    key6: [6]
  },
  key7: [7, {
    key8: 8
  }],
  key9: 9
}

// 该对象被加入到一个 Vue 实例中
var vm = new Vue({
  el: '#example',
  data: data,
  computed: {
    testA() {
      console.log('changeA')
      return this.key1.key3.key5;
    },
    testB() {
      console.log('changeB')
      return this.key7;
    },
    testC() {
      console.log('changeC')
      return this.key7.map(o => o.key8);
    },
    testD() {
      console.log('changeD')
      return JSON.stringify(this.key7);
    },
  }
})

document.documentElement.addEventListener("click", function(){
  vm.$set(vm.key7[1], "newkey", "newval")
  // vm.key7[1].key8 += 1;
});
经过observe(data)设置dep后,数据结构中的dep如下图所示:
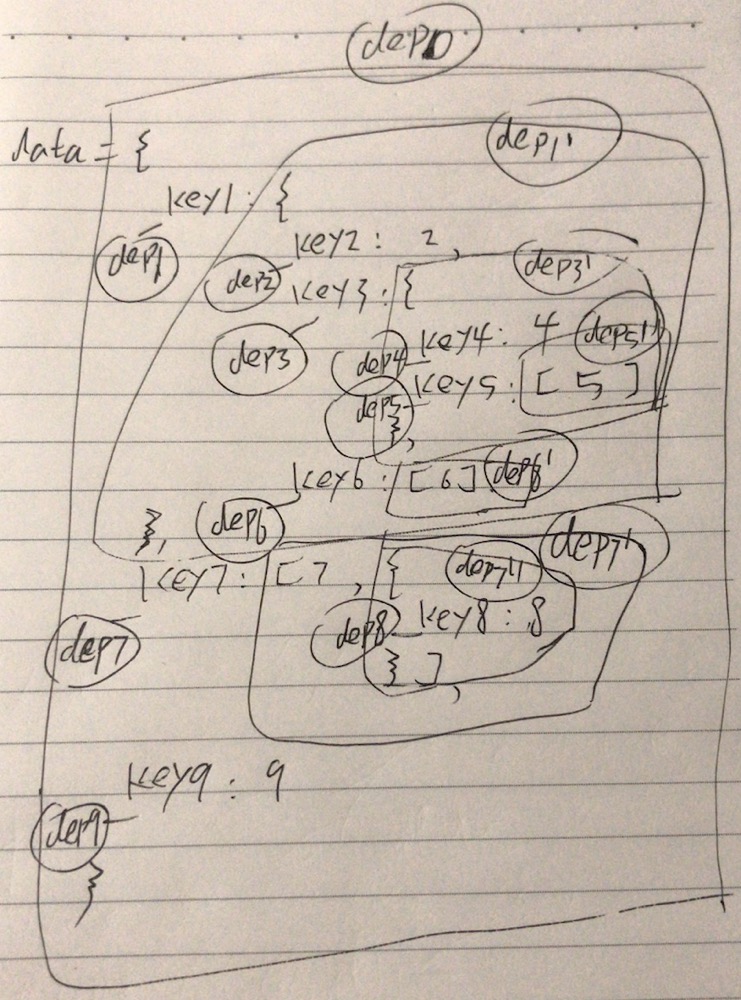
其中 dep1、dep2、dep3、dep4、dep5、dep6、dep7、dep8、dep9都属于第一种dep实例化类型,而dep0、dep1’、dep3’、dep5’、dep6’、dep7’、dep7’‘属于第二种dep实例化类型。
testA会收集dep1、dep1’、dep3、dep3’、dep5、dep5’,下面这些操作都会触发testA的update:
this.key1 = 1; // 触发dep1
this.$set(this.key1, "newkey", "newval") // 触发dep1'
this.key1.key3 = 1; // 触发dep3
this.$set(this.key1.key3, "newkey", "newval") // 触发dep3'
this.key1.key3.key5 = 1; // 触发dep5
this.key1.key3.key5.push('newval') // 触发dep5'
this.key1.key3.key5.splice(0, 1, 'newval') // 触发dep5'
testB会收集dep7、dep7’、dep7’‘,下面这些操作都会触发testB的update:
this.key7 = 1; // 触发dep7
this.key7.push('newval') // 触发dep7'
this.key7.splice(0, 1, 'newval') // 触发dep7'
this.$set(vm.key7[1], "newkey", "newval") // 触发dep7''
testC会收集dep7、dep7’、dep7’‘、dep8,下面这些操作都会触发testC的update:
this.key7 = 1; // 触发dep7
this.key7.push('newval') // 触发dep7'
this.key7.splice(0, 1, 'newval') // 触发dep7'
this.$set(vm.key7[1], "newkey", "newval") // 触发dep7''
this.key7[1].key8 = 1; // 触发dep8
testD与testC相同,这里不再叙述。
这里vue渲染函数会依赖testA、testB、testC、testD中所有的dep,如果它们返回的对象需要用来渲染页面,那么还会触发这些对象中属性的get。 比如这里如果这样改:
<div id="example">
  <div></div>
</div>
<script>
  // 我们的数据对象
  var data = {
    key1: {
      key2: 2,
      key3: {
        key4: 4,
        key5: [5],
      },
      key6: [6]
    },
    key7: [7, {
      key8: 8
    }],
    key9: 9
  }

  // 该对象被加入到一个 Vue 实例中
  var vm = new Vue({
    el: '#example',
    data: data,
    watch: {
      key7: function() {
        console.log('key7change')
      }
    },

  })
document.documentElement.addEventListener("click", function(){
  vm.key7[1].key8 += 1; // 触发dep8 update
});
我们点击页面依旧能触发视图渲染函数执行,视图更新,但对key7对watch回调不会执行,因为渲染函数有依赖dep8,key7的watch没有依赖dep8。
array劫持
我们先来考虑下数组修改有哪几种情况:
- 当你利用索引直接设置一个项时
比如:
data={arr:[1,2,3]},这个时候我设置this.arr[0] = 4,会发现数据改变了,但是视图没有更新,Vue根本没有检测到变化。
这个时候可能你会说,observeArray的时候不是会遍历数组,observe每个元素吗?
可是Observe数据的时候是会判断数据类型的,只会处理数组和对象,而this.arr里面的元素是字符串,所以无法转化成observer类,也就不会有getter/setter。
另一方面,即便arr里面是对象,比如:
{arr:[{testobj: true}]},数组元素{testobj: true}会被observe到,那也只是在{testobj: true}对象里面的属性改变的时候响应,而{testobj: true}对象被替换是无法感知的。
- 调用数组的变异方法
push(),pop(),shift(),unshift(),splice(),sort(),reverse(),这些方法是会让数组的值发生改变的,比如:
arr=[0,1];arr.puah(3);此时arr=[1,2,3],arr发生了改变,此时是需要更新视图的,但是arr的getter/setter拦截不到变化(只有在赋值的时候才会调用setter,比如:arr=[6,7,8])。
- 当你修改数组的长度时,例如:
vm.items.length = newLength
对于第一种情况,和对象的增减一样,可以使用vm.$set/Vue.set和vm.$delete/Vue.delete这几个api.
对于第二种情况,可以通过改写这些变异方法完成,在调用这些方法的时候发布更新消息。下面我们来看代码
const arrayProto = Array.prototype
export const arrayMethods = Object.create(arrayProto)

const methodsToPatch = [
  'push',
  'pop',
  'shift',
  'unshift',
  'splice',
  'sort',
  'reverse'
]

/**
 * Intercept mutating methods and emit events
 */
methodsToPatch.forEach(function (method) {
  // cache original method
  const original = arrayProto[method]
  def(arrayMethods, method, function mutator (...args) {
    const result = original.apply(this, args) // 调用原生的数组方法
    const ob = this.__ob__ // 获取observe对象
    let inserted
    switch (method) {
      case 'push':
      case 'unshift':
        inserted = args
        break
      case 'splice':
        inserted = args.slice(2)
        break
    }
    //inserted存储的是新加到数组里的元素,需要被observe
    if (inserted) ob.observeArray(inserted) // 继续递归
    // notify change
    // 发布更新
    ob.dep.notify()
    return result
  })
})
回过头再看Observer类中对于数组的处理,先覆盖变异数组,再observe每个数组元素。所以每当调用数组的变异方法的时候,都会更新视图。
对于第三种情况,可以使用splice来完成,splice是变异方法,会发布更新。
至于为什么vue不使用Object.defineProperty通过索引属性来设置属性的访问器属性,比如下面这样?
  if (Array.isArray(value)) {
    value.forEach((item, index) => {
      defineReactive(value, index)
    })
  } else {
    this.walk(value)
  }

var arr = new Array(1000); // 要劫持1000个index
这个主要是因为性能消耗太大,性能代价和获得的用户体验收益不成正比,vue的做法是修改原生操作数组的方法,并且跟用户约定修改数组要用这些方法去操作。
Proxy
Proxy 可以理解成,在目标对象之前架设一层“拦截”,外界对该对象的访问,都必须先通过这层拦截,因此提供了一种机制,可以对外界的访问进行过滤和改写。
我们都知道,Vue 3.0 要用 Proxy 替换 Object.defineProperty,那么这么做的好处是什么呢?
好处是显而易见的,比如上述 Vue 现存的两个问题,不能响应对象属性的添加和删除以及不能直接操作数组下标的问题,都可以解决。当然也有不好的,那就是兼容性问题,而且这个兼容性问题 babel 还无法解决。
Proxy 实现观察者模式
我们前面分析了 Vue 的源码,也了解了观察者模式的基本原理。那用 Proxy 如何实现观察者呢?我们可以简单写一下:
function Observer(obj) {
    Object.keys(obj).forEach(key => { // 做深度监听
        if (typeof obj[key] === 'object') {
            obj[key] = Observer(obj[key]);
        }
    });
    let dep = new Dep();
    let handler = {
        get: function (target, key, receiver) {
            Dep.target && dep.addSub(Dep.target);
            // 存在 Dep.target,则将其添加到dep实例中
            return Reflect.get(target, key, receiver);
        },
        set: function (target, key, value, receiver) {
            let result = Reflect.set(target, key, value, receiver);
            dep.notify(); // 进行发布
            return result;
        }
    };
    return new Proxy(obj, handler)
}
整体思路和 Vue 的差不多,需要注意的点仍旧是 get 操作时的闭包环境,使得 Dep.target && dep.addSub(Dep.target) 可以保证再每个属性的 getter 触发时,是当前 Watcher 实例。
Dep
现在看下Dep的源码:
core/observer/dep.js
//全局变量,每个实例中的dep实例的id都是从0开始累加的
let uid = 0

/**
 * A dep is an observable that can have multiple
 * directives subscribing to it.
 */
export default class Dep {
  static target: ?Watcher;
  id: number;
  subs: Array<Watcher>;

  constructor () {
    this.id = uid++
    this.subs = [] // 保存观察者watcher实例的数组
  }

  // 添加观察者
  addSub (sub: Watcher) {
    this.subs.push(sub)
  }

  // 移除观察者
  removeSub (sub: Watcher) {
    remove(this.subs, sub)
  }

  // 让Watcher收集依赖并添加订阅者。
  // Dep.target是一个Watcher, 可以查看Watcher的addDep方法。
  // 这个方法做的事情是:收集依赖后,调用了Dep的addSub方法,给Dep添加了一个订阅者
  depend () {
    if (Dep.target) {
      Dep.target.addDep(this)
    }
  }

  //发布数据更新:通过调用subs里面的每个Watcher的update发布更新
  notify () {
    // stabilize the subscriber list first
    const subs = this.subs.slice()
    if (process.env.NODE_ENV !== 'production' && !config.async) {
      // subs aren't sorted in scheduler if not running async
      // we need to sort them now to make sure they fire in correct
      // order
      subs.sort((a, b) => a.id - b.id)
    }
    for (let i = 0, l = subs.length; i < l; i++) {
      subs[i].update()
    }
  }
}

// The current target watcher being evaluated.
// This is globally unique because only one watcher
// can be evaluated at a time.
// 这是一个队列, 因为不允许有多个watcher的get方法同时调用
Dep.target = null
const targetStack = []

export function pushTarget (target: ?Watcher) {
  // 设置target, 把旧的放进stack
  targetStack.push(target)
  Dep.target = target
}

export function popTarget () {
  // 从stack拿一个作为当前的
  targetStack.pop()
  Dep.target = targetStack[targetStack.length - 1]
}
其实之前在分析Vue.set方法的时候就已经讲过Dep了,如果还没懂的同学可以结合这里的源码来看。
Dep类比较简单,对应方法也非常直观,这里最主要的就是维护了保存有观察者实例watcher的一个数组subs。
首先来分析变量:
-
全局Target. 这个其实是用来跟watcher交互的, 也保证了普通get的时候没有target就不设置依赖, 后面会解释.
-
id. 这是用来在watcher里依赖去重的, 也要到后面解释.
-
subs: 是一个watcher数组. sub应该是subscribe的意思, 也就是当前dep(依赖)的订阅者列表.
再来看方法:
- depend: 如果有
Dep.target, 就把自己添加到Dep.target中(调用了Dep.target.addDep(this)).
那么什么时候有Dep.target呢, 就由pushTarget()和popTarget()来操作了, 这些方法在Dep中没有调用, 后面会分析是谁在操作Dep.target.
- notify: 这个是setter劫持以后调用的最终方法, 把当前Dep订阅中的每个watcher都调用
update()方法.
Watcher
我们先从构造函数看起::
core/observer/watcher.js
let uid = 0

/**
 * A watcher parses an expression, collects dependencies,
 * and fires callback when the expression value changes.
 * This is used for both the $watch() api and directives.
 */
export default class Watcher {
  vm: Component;
  expression: string;
  cb: Function;
  id: number;
  deep: boolean;
  user: boolean;
  lazy: boolean;
  sync: boolean;
  dirty: boolean;
  active: boolean;
  deps: Array<Dep>;
  newDeps: Array<Dep>;
  depIds: SimpleSet;
  newDepIds: SimpleSet;
  before: ?Function;
  getter: Function;
  value: any;

  constructor (
    vm: Component,
    expOrFn: string | Function,
    cb: Function,
    options?: ?Object,
    isRenderWatcher?: boolean
  ) {
    this.vm = vm // 保存vm
    if (isRenderWatcher) {
      vm._watcher = this
    }
    vm._watchers.push(this) // 把watcher存到vm里
    // options
    // 读取配置 或 设置默认值
    if (options) {
      this.deep = !!options.deep
      this.user = !!options.user
      // 跟computed相关
      this.lazy = !!options.lazy
      this.sync = !!options.sync
      this.before = options.before
    } else {
      this.deep = this.user = this.lazy = this.sync = false
    }
    this.cb = cb // 保存传入的回调函数
    this.id = ++uid // uid for batching
    this.active = true
    this.dirty = this.lazy // for lazy watchers
    this.deps = [] // 保存观察数据当前的dep实例对象
    this.newDeps = [] // 保存观察数据最新的dep实例对象
    this.depIds = new Set()
    this.newDepIds = new Set()
    this.expression = process.env.NODE_ENV !== 'production'
      ? expOrFn.toString()
      : ''
    // parse expression for getter
    //这里的getter会有两种情况:
      一、一个函数,比如在生命周期mount的时候,需要watch模板中的值,这个时候传过来的是一个函数,后面在get函数里调用时这个函数时,这个函数会调用数据的getter函数。
      二、一个表达式,比如我们在Vue实例的watch中写的表达式,后面在get函数里获取表达式的值的时候会调用数据的getter函数。
      expOrFn参数是一个字符串,比如testObj.testObjFirstVal,此时testObj仅仅是一个字符串,而不是对象,我们无法直接获取testObjFirstVal属性的值。
      所以我们在获取值得时候不能直接拿到值,parsePath函数就是用来解决这个问题的,这个函数具体的操作,在后面的代码里。
    if (typeof expOrFn === 'function') {
      this.getter = expOrFn
    } else {
      // 通过parsePath方法获取观察对象expOrFn的get方法
      this.getter = parsePath(expOrFn)
      if (!this.getter) {
        this.getter = noop
        process.env.NODE_ENV !== 'production' && warn(
          `Failed watching path: "${expOrFn}" ` +
          'Watcher only accepts simple dot-delimited paths. ' +
          'For full control, use a function instead.',
          vm
        )
      }
    }
    //注意这个地方,在非computed调用Watch函数外,都会调用get函数(computed有自己的逻辑)
    this.value = this.lazy
      ? undefined
      : this.get()
  }

  /**
   * Evaluate the getter, and re-collect dependencies.
   */
  get () {
    // 进入队列, 把当前watcher设置为Dep.target
    // 这样下面调用getter的时候出发的dep.append() (最后调用Dep.target.addDep()) 就会调用这个watcher的addDep.
    pushTarget(this)
    let value
    const vm = this.vm
    try {
      // 调用getter的时候会走一遍表达式,
      // 如果是 this.a + this.b , 会在a和b的getter中调用Dep.target.addDep(), 最后结果就调用了当前watcher的addDep,
      // 当前watcher就有了this.a的dep和this.b的dep
      // addDep把当前watcher加入了dep的sub(subscribe)里, dep的notify()调用就会运行本watcher的run()方法.
      value = this.getter.call(vm, vm)
    } catch (e) {
      if (this.user) {
        handleError(e, vm, `getter for watcher "${this.expression}"`)
      } else {
        throw e
      }
    } finally {
      // "touch" every property so they are all tracked as
      // dependencies for deep watching
      // 走到这里已经通过了getter获得到了value, 或者失败为undefined, 这个值返回作为watcher的valule
      // 处理deep选项
      if (this.deep) {
        traverse(value)
      }
      // 此时观察数据的依赖已经收集完
      popTarget() // 移除队列
      this.cleanupDeps() // 清理依赖(addDep加到newDep数组, 这步做整理动作)
    }
    return value
  }

  /**
   * Add a dependency to this directive.
   */
  addDep (dep: Dep) {
    const id = dep.id
    if (!this.newDepIds.has(id)) {
      this.newDepIds.add(id)
      this.newDeps.push(dep)
      //这里做了一个去重,如果depIds里包含这个id,说明在之前给depIds添加这个id的时候,已经调用过 dep.addSub(this),即添加过订阅,不需要重复添加。
      if (!this.depIds.has(id)) {
        dep.addSub(this)
      }
    }
  }

  /**
   * Clean up for dependency collection.
   */
  cleanupDeps () {
    let i = this.deps.length
    //去除多余的订阅者
    while (i--) {
      const dep = this.deps[i]
      if (!this.newDepIds.has(dep.id)) {
        dep.removeSub(this)
      }
    }
    let tmp = this.depIds
    //更新depIds
    this.depIds = this.newDepIds
    this.newDepIds = tmp
    //清空newDepIds
    this.newDepIds.clear()
    tmp = this.deps
    //更新deps
    this.deps = this.newDeps
    this.newDeps = tmp
    //清空newDeps
    this.newDeps.length = 0
  }

  /**
   * Subscriber interface.
   * Will be called when a dependency changes.
   */
  update () {
    /* istanbul ignore else */
    //下面三种情况均会调用run方法
    if (this.lazy) {
      this.dirty = true
    } else if (this.sync) {
      this.run()
    } else {
      // queueWatcher这个函数最终会调用run方法。
      queueWatcher(this)
    }
  }

  /**
   * Scheduler job interface.
   * Will be called by the scheduler.
   */
  //注意这里调用了get方法,会更新模板,且重新收集依赖
  run () {
    if (this.active) {
      const value = this.get()
      if (
        value !== this.value ||
        // Deep watchers and watchers on Object/Arrays should fire even
        // when the value is the same, because the value may
        // have mutated.
        isObject(value) ||
        this.deep
      ) {
        // set new value
        const oldValue = this.value
        this.value = value
        if (this.user) {
          try {
            this.cb.call(this.vm, value, oldValue)
          } catch (e) {
            handleError(e, this.vm, `callback for watcher "${this.expression}"`)
          }
        } else {
          this.cb.call(this.vm, value, oldValue)
        }
      }
    }
  }

  /**
   * Evaluate the value of the watcher.
   * This only gets called for lazy watchers.
   */
  evaluate () {
    this.value = this.get()
    this.dirty = false
  }

  /**
   * Depend on all deps collected by this watcher.
   */
  depend () {
    let i = this.deps.length
    while (i--) {
      this.deps[i].depend()
    }
  }

  /**
   * Remove self from all dependencies' subscriber list.
   */
  teardown () {
    if (this.active) {
      // remove self from vm's watcher list
      // this is a somewhat expensive operation so we skip it
      // if the vm is being destroyed.
      if (!this.vm._isBeingDestroyed) {
        remove(this.vm._watchers, this)
      }
      let i = this.deps.length
      while (i--) {
        this.deps[i].removeSub(this)
      }
      this.active = false
    }
  }
}
注释都写了, 总结一下构造器做了什么事:
-
处理传入的参数并设置成自己的属性.
-
parse表达式. watcher表达式接受2种: 方法/字符串. 如果是方法就设为getter, 如果是字符串会进行处理:
core/util/lang.js
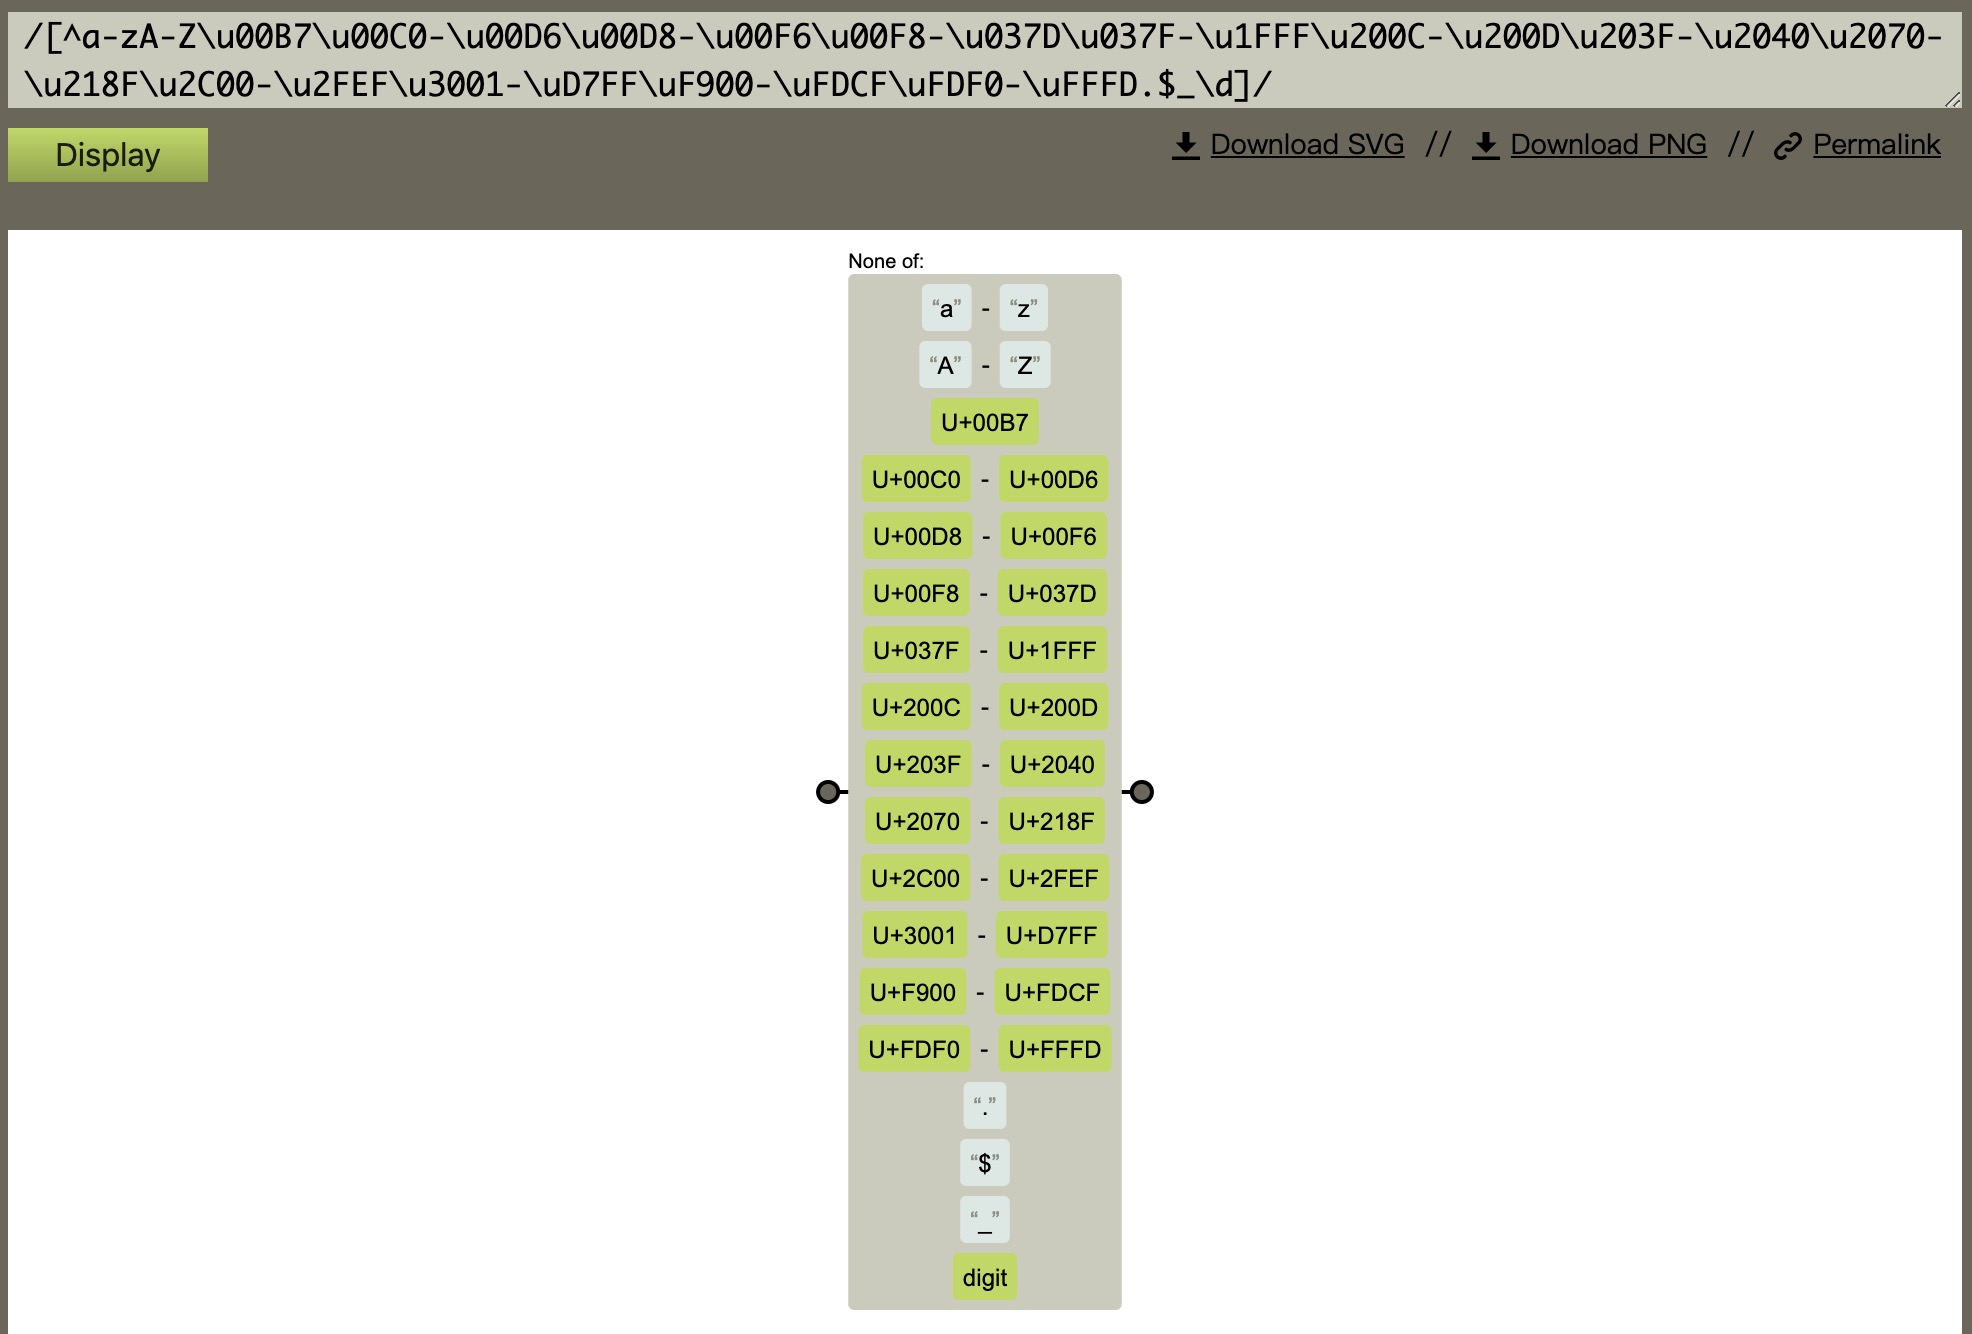
export const unicodeRegExp = /a-zA-Z\u00B7\u00C0-\u00D6\u00D8-\u00F6\u00F8-\u037D\u037F-\u1FFF\u200C-\u200D\u203F-\u2040\u2070-\u218F\u2C00-\u2FEF\u3001-\uD7FF\uF900-\uFDCF\uFDF0-\uFFFD/

/**
 * Parse simple path.
 */
const bailRE = new RegExp(`[^${unicodeRegExp.source}.$_\\d]`)
export function parsePath (path: string): any {
  // 非法字符串直接返回
  if (bailRE.test(path)) {
    return
  }
  // 这里是vue如何分析watch的, 就是接受 '.' 分隔的变量.
  // 如果键是'a.b.c', 也就等于function () {return this.a.b.c}
  return function (obj) {
    for (let i = 0; i < segments.length; i++) {
      if (!obj) return
      obj = obj[segments[i]]
    }
    return obj
  }
}
这里的正则匹配表达式用来匹配任何不在合法范围内的字符:
我们先来理一理watch函数做的事情:初始化变量——>获取getter函数,这里的getter函数是用来获取数据的值,函数执行过程中会调用数据的getter函数,会收集依赖——>调用watcher的get方法,收集依赖,获取值,并将这些东西记录下来。
这个过程就完成了收集依赖的过程,而update函数是用来接收数据发布更新的消息并更新模板或表达式的。
下面我们重点来关注这几点:
- 收集依赖指的是谁收集依赖,依赖又是指的什么?
看英文注释:Watcher的作用是分割表达式,收集依赖并且在值变化的时候调用回调函数。那么我们很明确知道是Watcher在收集依赖,依赖到底指什么呢?
我们上面说过一个Dep对应着一个数据(这个数据可能是:对象的属性、一个对象、一个数组);一个Watcher对应可以是一个模板也可以是一个$watch对应的表达式、函数等,无论那种情况,他们都依赖于data里面的数据,所以这里说的依赖其实就是模板或表达式所依赖的数据,对应着相关数据的Dep。
举个例子:下面这个$watch对应的函数依赖的数据就是testWatcher和testVal。所以这个$watch对应的Watcher收集的依赖就是testWatcher和testVal对应的Dep。
app.$watch(function(){
  return this.testWatcher + this.testVal;
},function(newVal){
  console.log(newVal)
 })
- Watcher有四个使用的场景,只有在这四种场景中,Watcher才会收集依赖,更新模板或表达式,否则,数据改变后,无法通知依赖这个数据的模板或表达式:
-
第一种:观察模板中的数据
-
第二种:观察创建Vue实例时watch选项里的数据
-
第三种:观察创建Vue实例时computed选项里的数据所依赖的数据
-
第四种:调用
$watchapi观察的数据或表达式
所以在解决数据改变,模板或表达式没有改变的问题时,可以这么做:
首先仔细看一看数据是否在上述四种应用场景中,以便确认数据已经收集依赖;其次查看改变数据的方式,确定这种方式会使数据的改变被拦截。
Dep.target的作用
我们前面说过收集依赖的时机是在调用数据的getter函数的时候,但是在这个时候数据的getter函数不知道当前的Watcher是哪一个,所以这里使用了一个全局变量来记录当前的Watcher,方便添加依赖到正在执行的Watcher。关于这点官方的英文注释写的挺清楚的。
- targetStack的作用(Watcher函数的get方法中pushTarget和popTarget方法中用到)
Vue2 中,视图被抽象为一个 render 函数,一个 render 函数只会生成一个 watcher。比如我们有如下一个模板,模板中使用了Header组件。Vue2 中组件数的结构在视图渲染时就映射为 render 函数的嵌套调用,有嵌套调用就会有调用栈。当 render模板时,遇到Header组件会调用Header组件的render函数,两个render函数依次入栈,执行完函数,依次出栈。
<div id="app">
  <Header></Header>
</div>
5.Watcher函数的get方法中调用this.getter.call(vm, vm)收集完依赖后,又调用this.cleanupDeps()清除依赖?
Watcher里面有两个属性:deps和newDeps。他们是用来记录上一次Watcher收集的依赖和新一轮Watcher收集的依赖,每一次有数据的更新都需要重新收集依赖(数据发布更新后,会调用Watcher的notify方法,notify方法会调用run方法,run方法会调用get方法,重新获取值,并重新收集依赖)。举个简单的例子:我们点击一个按钮,用$set给data添加了一个新属性newVal。上一轮收集的依赖中并没有newVal的依赖,所以需要重新收集依赖。
this.cleanupDeps()这个函数的作用就是将新收集的依赖newDeps赋值给deps,并将newDeps清空,准备在下一次数据更新时收集依赖。所以这个函数不是真正的清空Watcher的依赖,而是清除临时保存依赖的newDeps。
initWatch
initWatch源码如下:
src/core/instance/state.js
function initWatch (vm: Component, watch: Object) {
  for (const key in watch) {
    // handler 是观察对象的回调函数
    const handler = watch[key]
    if (Array.isArray(handler)) {
      for (let i = 0; i < handler.length; i++) {
        createWatcher(vm, key, handler[i])
      }
    } else {
      createWatcher(vm, key, handler)
    }
  }
}
createWatcher(vm, key, handler)是根据入参构建Watcher实例信息,源码如下:
function createWatcher (
  vm: Component,
  expOrFn: string | Function,
  handler: any,
  options?: Object
) {
  // 判断是否是对象,是的话提取对象里面的handler方法
  if (isPlainObject(handler)) {
    options = handler
    handler = handler.handler
  }
  // 判断handler是否是字符串,是的话说明是vm实例上的一个方法
  // 通过vm[handler]获取该方法
  // 如 handler='sayHello', 那么handler = vm.sayHello
  if (typeof handler === 'string') {
    handler = vm[handler]
  }
  // 最后调用vm原型链上的$watch(...)方法创建Watcher实例
  return vm.$watch(expOrFn, handler, options)
}
$watch是定义在Vue原型链上的方法,源码如下:
core/instance/state.js
Vue.prototype.$watch = function (
  expOrFn: string | Function,
  cb: any,
  options?: Object
): Function {
  const vm: Component = this
  if (isPlainObject(cb)) {
    return createWatcher(vm, expOrFn, cb, options)
  }
  options = options || {}
  options.user = true
  const watcher = new Watcher(vm, expOrFn, cb, options)
  if (options.immediate) {
    try {
      cb.call(vm, watcher.value)
    } catch (error) {
      handleError(error, vm, `callback for immediate watcher "${watcher.expression}"`)
    }
  }
  // 该方法返回一个函数的引用,直接调用该函数就会调用watcher对象的teardown()方法,从它注册的列表中(subs)删除自己。
  return function unwatchFn () {
    watcher.teardown()
  }
}
经过一系列的封装,这里终于看到了创建Watcher实例对象了。
实例分析
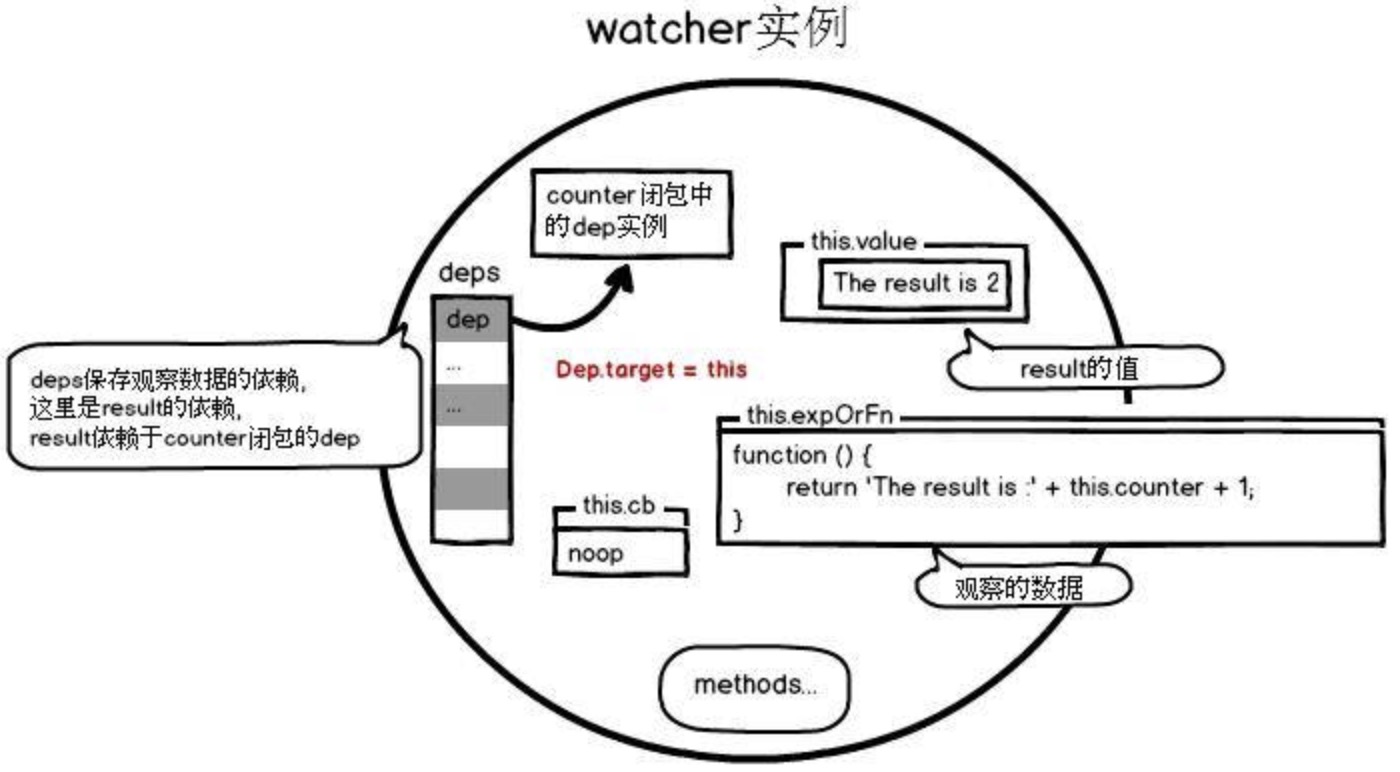
这里看一个watch属性的例子:
var vue = new Vue({
    el: "#app",
    data: {
        counter: 1
    },
    watch: {
        counter: function(val, oldVal) {
            console.log('counter changed...')
        }
    }
})
例子中Observer,Watcher类之间的关联关系图如下所示:
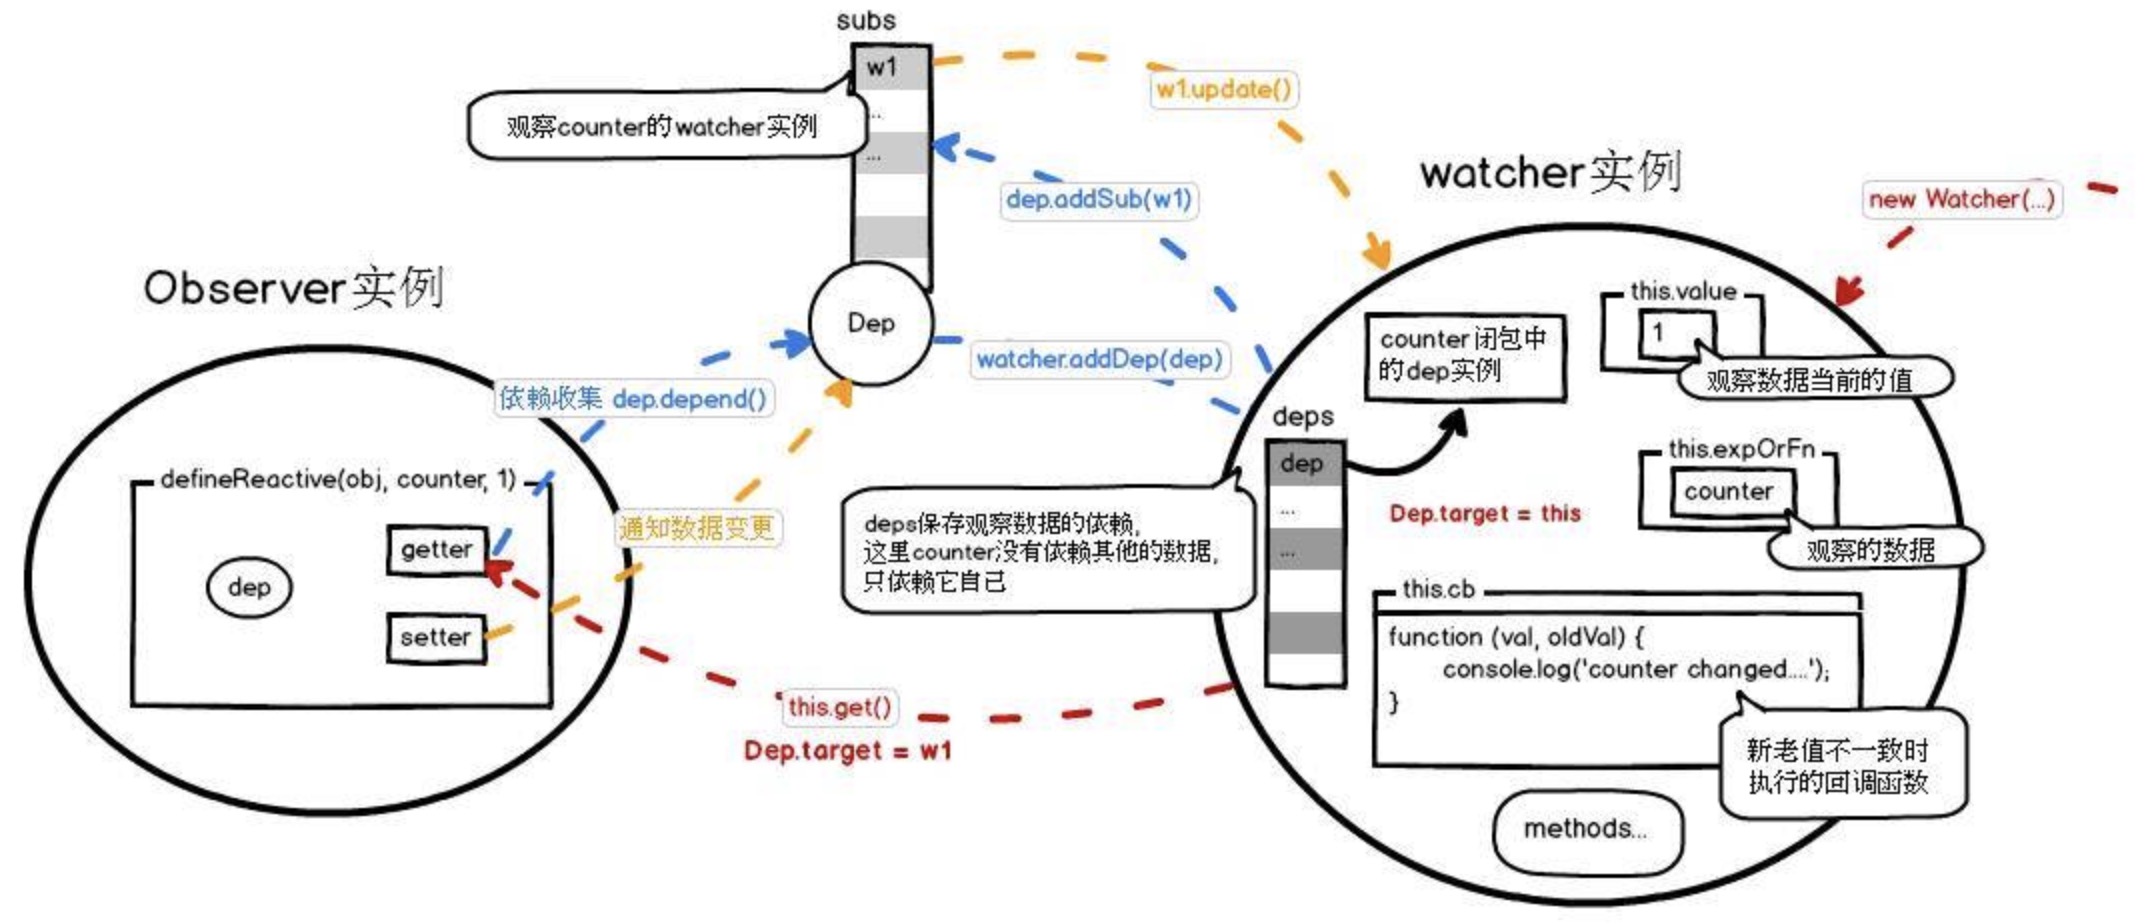
-
红色箭头:Watcher类实例化,调用watcher实例的
get()方法,并设置Dep.target为当前watcher实例,触发观察对象的getter方法。 -
蓝色箭头:counter对象的getter方法被触发,调用
dep.depend()进行依赖收集并返回counter的值。依赖收集的结果:-
counter闭包的dep实例的subs添加观察它的watcher实例w1;
-
w1的deps中添加观察对象counter的闭包dep。
-
-
橙色箭头:当counter的值变化后,触发subs中观察它的w1执行
update()方法,最后实际上是调用w1的回调函数cb。
initComputed
我们找到initComputed的定义:
const computedWatcherOptions = { lazy: true }

function initComputed (vm: Component, computed: Object) {
  // $flow-disable-line
  // 往组件实例上添加一个_computedWatchers属性,保存所有的computed watcher
  const watchers = vm._computedWatchers = Object.create(null)
  // computed properties are just getters during SSR
  const isSSR = isServerRendering()

  for (const key in computed) {
    // 循环每个computed
    // 格式滤错滤空
    const userDef = computed[key]
    // 我们在定义computed时可以是一个函数,也可以是一个对象{get:function(){}, set:function(){}}
    const getter = typeof userDef === 'function' ? userDef : userDef.get
    if (process.env.NODE_ENV !== 'production' && getter == null) {
      warn(
        `Getter is missing for computed property "${key}".`,
        vm
      )
    }

    if (!isSSR) {
      // create internal watcher for the computed property.
      // 数据响应过程中的watcher(注意第二个参数是我们刚才拿到的getter,记住了)
      watchers[key] = new Watcher(
        vm,
        getter || noop,
        noop, // noop是定义的一个空方法,这里没有回调函数用noop代替
        computedWatcherOptions // { lazy: true }
      )
    }

    // component-defined computed properties are already defined on the
    // component prototype. We only need to define computed properties defined
    // at instantiation here.
    // 因为没有被代理, computed属性是不能通过vm.xx获得的, 如果可以获得说明重复定义, 抛出异常.
    if (!(key in vm)) {
      defineComputed(vm, key, userDef)
    } else if (process.env.NODE_ENV !== 'production') {
      if (key in vm.$data) {
        warn(`The computed property "${key}" is already defined in data.`, vm)
      } else if (vm.$options.props && key in vm.$options.props) {
        warn(`The computed property "${key}" is already defined as a prop.`, vm)
      }
    }
  }
}
已注释, 总结为:
-
遍历每个computed键值, 过滤错误语法.
-
遍历每个computed键值, 为他们建立watcher, options为
{ lazy: true}. -
遍历每个computed键值, 调用defineComputed.
那么继续看defineComputed.
export function defineComputed (
  target: any,
  key: string,
  userDef: Object | Function
) {
  const shouldCache = !isServerRendering()
  // 因为computed除了function还有get set 字段的语法, 下面的代码是做api的兼容
  if (typeof userDef === 'function') {
    sharedPropertyDefinition.get = shouldCache
      ? createComputedGetter(key)
      : createGetterInvoker(userDef)
    sharedPropertyDefinition.set = noop
  } else {
    sharedPropertyDefinition.get = userDef.get
      ? shouldCache && userDef.cache !== false
        ? createComputedGetter(key)
        : createGetterInvoker(userDef.get)
      : noop
    sharedPropertyDefinition.set = userDef.set || noop
  }
  // 除非设置setter, computed属性是不能被修改的, 抛出异常 (evan说改变了自由哲学, 要控制低级用户)
  if (process.env.NODE_ENV !== 'production' &&
      sharedPropertyDefinition.set === noop) {
    sharedPropertyDefinition.set = function () {
      warn(
        `Computed property "${key}" was assigned to but it has no setter.`,
        this
      )
    }
  }
  // 这个函数的主要功能是computed属性的get进行了重写
  Object.defineProperty(target, key, sharedPropertyDefinition)
}

function createComputedGetter (key) {
  // 返回一个函数,也就是我们在上一个函数中那个get函数
  return function computedGetter () {
    // 拿到我们在initComputed函数中添加到vm上面的_computedWatchers
    const watcher = this._computedWatchers && this._computedWatchers[key]
    // 如果我们有定义computed属性,watcher必定存在
    if (watcher) {
      if (watcher.dirty) { // ****标记:知识点1
        watcher.evaluate() // ****标记:知识点2
      }
      if (Dep.target) { // ****标记:知识点3
        watcher.depend() // ****标记:知识点4
      }
      return watcher.value // ****标记:知识点5
    }
  }
}
注意下面这行代码,watcher.depend()的作用是把当前computed中watch收集的dep依赖让当前Dep.target中的watch也收集一遍,也就是说在一个watch依赖另一个watch时,会将被依赖watch的dep全部收集到自己的dep内:
  if (watcher) {
    if (watcher.dirty) { // ****标记:知识点1
      watcher.evaluate() // ****标记:知识点2
    }
    if (Dep.target) { // ****标记:知识点3
      watcher.depend() // ****标记:知识点4
    }
    return watcher.value // ****标记:知识点5
  }

  ...
  depend () {
    let i = this.deps.length
    while (i--) {
      this.deps[i].depend()
    }
  }
看到这里, computed注册核心一共做了两件事:
-
为每个computed建立
watcher(lazy: true) -
建立一个getter来depend, 并挂到vm上.
new Vue({
  data(){
    return {
      dataA: 'a',
      dataB: 'b'
    }
  },
  template: '<div>-</div>',
  computed: {
    computedA() {
      return 'computed ' + this.dataA
    }
  },
  method: {
      changeA(){
          this.dataA = 'change dataA'
      },
      changeB(){
          this.dataA = 'change dataB'
      }
  }
})
看在createComputedGetter函数
1,第一次页面渲染时模板中的``执行computedA.get() 转到函数createComputedGetter中
2,知识点1: this.dirty = true
3,知识点2:watcher.evaluate()执行,将this.dirty = false,watcher内部执行this.getter()
this.getter = computedA = function(){
    return 'computed' + this.dataA // 看这里,知识点update
}
得到了wacher.value 等于 computed a
4,watcher.depend()重新收集依赖,此时渲染函数的watch将computedA中watch的dep收集到自己的dep下(此处即dataA的dep),所以后面改变dataA会触发computedA中watch的update以及渲染函数watch的update
5,返回wacher.value,渲染到页面上<div>computed a-b</div>
6,我们通过调用this.changA()改变dataA,调用dataA中的dep.notify(),会执行dataA的所有watcher对象wathcer.update()(包括computedA中watch的update以及渲染函数watch的update),因为computed所属watcher的lazy永远为true,知识点1: this.dirty = true,这里暂时不会执行get
7,因为dataA改变了,触发页面重新渲染,重新渲染模板,模板中的``会调用computedA.get(),循环第1步
computed的属性缓存
通过上面computed的响应过程我们知道,computedA会监听dataA的改变去改变知识点1: this.dirty = true才最终执行了知识点getter
假设:
我们现在执行this.changeB(),改变了dataB值,
会执行dataB的所有watcher对象wathcer.update(),
因为dataB改变了,触发页面重新渲染,重新渲染模板,模板中的``再次调用computedA.get()转到函数createComputedGetter中。
因为computedA并没有监听dataB的改变,也就不会执行到computedA的watcher.update()知识点1:this.dirty = false,最终并不会执行到getter
直接返回上次getter的结果return watcher.value
实例分析
这里看一个计算属性的例子:
var vue = new Vue({
    el: "#app",
    data: {
        counter: 1
    },
    computed: {
        result: function() {
            return 'The result is :' + this.counter + 1;
        }
    }
})
示意图如下所示:
这里计算属性result因为依赖于this.counter,因此设置一个watcher用来观察result的值。随后通过definedComputed(vm, key, userDef)来定义计算属性。在计算获取result的时候,又会触发this.counter的getter方法,这样使得result的值依赖于this.counter的值。
initProps
最后我们再简单过一下props的初始化:
function initProps (vm: Component, propsOptions: Object) {
  const propsData = vm.$options.propsData || {} // 父组建传进来的props数据
  const props = vm._props = {} // 子组建的pops对象
  // cache prop keys so that future props updates can iterate using Array
  // instead of dynamic object key enumeration.
  const keys = vm.$options._propKeys = []
  const isRoot = !vm.$parent
  // root instance props should be converted
  if (!isRoot) {
    toggleObserving(false)
  }
  for (const key in propsOptions) {
    keys.push(key)
    const value = validateProp(key, propsOptions, propsData, vm) // 取出该key对应的value,如果没传则会取default的值
    /* istanbul ignore else */
    if (process.env.NODE_ENV !== 'production') {
      const hyphenatedKey = hyphenate(key)
      if (isReservedAttribute(hyphenatedKey) ||
          config.isReservedAttr(hyphenatedKey)) {
        warn(
          `"${hyphenatedKey}" is a reserved attribute and cannot be used as component prop.`,
          vm
        )
      }
      defineReactive(props, key, value, () => {
        if (!isRoot && !isUpdatingChildComponent) {
          warn(
            `Avoid mutating a prop directly since the value will be ` +
            `overwritten whenever the parent component re-renders. ` +
            `Instead, use a data or computed property based on the prop's ` +
            `value. Prop being mutated: "${key}"`,
            vm
          )
        }
      })
    } else {
      defineReactive(props, key, value) // 响应式劫持
    }
    // static props are already proxied on the component's prototype
    // during Vue.extend(). We only need to proxy props defined at
    // instantiation here.
    if (!(key in vm)) {
      proxy(vm, `_props`, key) // 做代理
    }
  }
  toggleObserving(true)
}
接着看pros是怎么取值的:
export function validateProp (
  key: string,
  propOptions: Object,
  propsData: Object,
  vm?: Component
): any {
  const prop = propOptions[key]
  const absent = !hasOwn(propsData, key)
  let value = propsData[key] // 取父组建传进来的值
  // boolean casting
  const booleanIndex = getTypeIndex(Boolean, prop.type)
  if (booleanIndex > -1) { // 如果是boolean类型,且没有传值
    if (absent && !hasOwn(prop, 'default')) {
      value = false
    } else if (value === '' || value === hyphenate(key)) {
      // only cast empty string / same name to boolean if
      // boolean has higher priority
      const stringIndex = getTypeIndex(String, prop.type)
      if (stringIndex < 0 || booleanIndex < stringIndex) {
        value = true
      }
    }
  }
  // check default value
  if (value === undefined) { // 其它类型,且没有传值
    value = getPropDefaultValue(vm, prop, key) // 重点关注,取默认值的逻辑
    // since the default value is a fresh copy,
    // make sure to observe it.
    const prevShouldObserve = shouldObserve
    toggleObserving(true)
    observe(value)
    toggleObserving(prevShouldObserve)
  }
  if (
    process.env.NODE_ENV !== 'production' &&
    // skip validation for weex recycle-list child component props
    !(__WEEX__ && isObject(value) && ('@binding' in value))
  ) {
    assertProp(prop, key, value, vm, absent)
  }
  return value
}

/**
 * Use function string name to check built-in types,
 * because a simple equality check will fail when running
 * across different vms / iframes.
 */
function getType (fn) {
  const match = fn && fn.toString().match(/^\s*function (\w+)/)
  return match ? match[1] : ''
}

// 比较props的类型
function isSameType (a, b) {
  return getType(a) === getType(b)
}

// 如果有定义可以是多个类型,则需要依次比较
function getTypeIndex (type, expectedTypes): number {
  if (!Array.isArray(expectedTypes)) {
    return isSameType(expectedTypes, type) ? 0 : -1
  }
  for (let i = 0, len = expectedTypes.length; i < len; i++) {
    if (isSameType(expectedTypes[i], type)) {
      return i
    }
  }
  return -1
}
在没有传值,需要取默认值时:
/**
 * Get the default value of a prop.
 */
function getPropDefaultValue (vm: ?Component, prop: PropOptions, key: string): any {
  // no default, return undefined
  if (!hasOwn(prop, 'default')) {
    return undefined
  }
  const def = prop.default
  // warn against non-factory defaults for Object & Array
  if (process.env.NODE_ENV !== 'production' && isObject(def)) {
    warn(
      'Invalid default value for prop "' + key + '": ' +
      'Props with type Object/Array must use a factory function ' +
      'to return the default value.',
      vm
    )
  }
  // the raw prop value was also undefined from previous render,
  // return previous default value to avoid unnecessary watcher trigger
  // 如果重复声明了一个props,且之前的也是父组件没有传值进来,则不再做代理
  if (vm && vm.$options.propsData &&
    vm.$options.propsData[key] === undefined &&
    vm._props[key] !== undefined
  ) {
    return vm._props[key]
  }
  // call factory function for non-Function types
  // a value is Function if its prototype is function even across different execution context
  // 如果是函数,且类型不是函数,则会执行,否则直接取值
  return typeof def === 'function' && getType(prop.type) !== 'Function'
    ? def.call(vm)
    : def
}
数据初始化的顺序
这里我们再回到initState函数,看一下这些初始化的顺序:
export function initState (vm: Component) {
  vm._watchers = []
  const opts = vm.$options
  if (opts.props) initProps(vm, opts.props)
  if (opts.methods) initMethods(vm, opts.methods)
  if (opts.data) {
    initData(vm)
  } else {
    observe(vm._data = {}, true /* asRootData */)
  }
  if (opts.computed) initComputed(vm, opts.computed)
  if (opts.watch && opts.watch !== nativeWatch) {
    initWatch(vm, opts.watch)
  }
}
可以看到,是按props、methods、data、computed、watch的顺序依次初始化一个新的vue对象。因为props和methods不依赖与其它项,所以优先初始化。而computed和watch都需要data先进行数据劫持才能开始观察,所以他们在data初始化之后才能初始化。
这里的先后顺序是很重要的,如果数据初始化存在依赖关系,则会造成数据获取不到。
因为props默认值我们可以定义为函数,所以我们来看props中获取默认值的方法:
/**
 * Get the default value of a prop.
 */
function getPropDefaultValue (vm: ?Component, prop: PropOptions, key: string): any {
  ...
  return typeof def === 'function' && getType(prop.type) !== 'Function'
    ? def.call(vm) // 这里会把this绑定为当前vm实例,但此时其它属性都还未定义
    : def
}
因为props是最先定义的,我们在props中没法调用methods中的方法,也没法获取data、computed值
而对于initData,相关代码如下:
function initData (vm: Component) {
  let data = vm.$options.data
  data = vm._data = typeof data === 'function'
    ? getData(data, vm)
    : data || {}
  ...
}

export function getData (data: Function, vm: Component): any {
  pushTarget()
  try {
    return data.call(vm, vm)// 这里会把this绑定为当前vm实例,且会当作第一个参数传入,此时可以访问props和methods,但computed属性还未定义
  } catch (e) {
    handleError(e, vm, `data()`)
    return {}
  } finally {
    popTarget()
  }
}
在初始化data的时候,我们可以获取到此时已经初始化完成的props和methods属性,但computed属性还不能获取到,且如果methods依赖与computed属性,那么data即使可以调用这个methods但无法获取到对应但computed。
结合上面分析,我们来看如下代码:
export default {
  props: {
    propsKey: {
      type: String,
      default() {
        return 'props值';
        return this.dataKey; // undefined,获取不到,此时data尚未初始化
        return this.methodsKey1(); // 报错,获取不到,此时methods尚未初始化
      }
    },
  },
  data() {
    return {
      dataKey1: 'data值'; // 'data值'
      dataKey2: this.propsKey; // 'props值',可以获取,此时props已经初始化
      dataKey3: this.computedKey; // undefined,获取不到,此时computed尚未初始化
      dataKey4: this.methodsKey1(); // '普通值',可以获取,此methods不依赖computed
      dataKey5: this.methodsKey2(); // undefined,获取不到,此methods依赖computed,而此时computed尚未初始化
    };
  },
  computed: {
    computedKey() {
      return 'computed值';
    },
  },
  methods: {
    methodsKey1() {
      return '普通值';
    },
    methodsKey2() {
      return this.computedKey; // 返回一个computed属性的值
    },
  }
};
小结
最后来几个简单问题回顾一下:
Q1:Watcher,Dep,Observer这几个类之间的关系?
A1:Watcher是观察者观察经过Observer封装过的数据,Dep是Watcher和观察数据间的纽带,主要起到依赖收集和通知更新的作用。
Q2:Dep中的subs存储的是什么?
A2: subs存储的是观察者Watcher实例。
Q3:Watcher中的deps存储的是什么?
A3:deps存储的是观察数据闭包中的dep实例。
Q4:Dep.target是什么,该值是何处赋值的?
A4:Dep.target是全局变量,保存当前的watcher实例,在new Watcher()的时候进行赋值,赋值为当前Watcher实例。
批量异步更新与nextTick原理
异步更新
之前我们在依赖收集原理的响应式化方法 defineReactive 中的 setter 访问器中有派发更新 dep.notify() 方法,这个方法会挨个通知在 dep 的 subs 中收集的订阅自己变动的watchers执行update。一起来看看 update 方法的实现:
// src/core/observer/watcher.js

/**
  * Subscriber interface.
  * Will be called when a dependency changes.
  */
update () {
  /* istanbul ignore else */
  if (this.lazy) {
    this.dirty = true
  } else if (this.sync) {
    this.run()
  } else {
    queueWatcher(this)
  }
}
如果不是 computed watcher 也非 sync 会把调用update的当前watcher推送到调度者队列中,下一个tick时调用,看看 queueWatcher :
// src/core/observer/scheduler.js

export const MAX_UPDATE_COUNT = 100

const queue: Array<Watcher> = []
const activatedChildren: Array<Component> = []
let has: { [key: number]: ?true } = {}
let circular: { [key: number]: number } = {}
let waiting = false
let flushing = false
let index = 0

/**
 * Push a watcher into the watcher queue.
 * Jobs with duplicate IDs will be skipped unless it's
 * pushed when the queue is being flushed.
 */
export function queueWatcher (watcher: Watcher) {
  const id = watcher.id
  if (has[id] == null) {
    has[id] = true
    if (!flushing) {
      queue.push(watcher)
    } else {
      // if already flushing, splice the watcher based on its id
      // if already past its id, it will be run next immediately.
      let i = queue.length - 1
      while (i > index && queue[i].id > watcher.id) {
        i--
      }
      queue.splice(i + 1, 0, watcher)
    }
    // queue the flush
    if (!waiting) {
      waiting = true

      if (process.env.NODE_ENV !== 'production' && !config.async) {
        flushSchedulerQueue()
        return
      }
      nextTick(flushSchedulerQueue)
    }
  }
}

/**
 * Reset the scheduler's state.
 */
function resetSchedulerState () {
  index = queue.length = activatedChildren.length = 0
  has = {}
  if (process.env.NODE_ENV !== 'production') {
    circular = {}
  }
  waiting = flushing = false
}
这里使用了一个 has 的哈希map用来检查是否当前watcher的id是否存在,若已存在则跳过,不存在则就push到 queue 队列中并标记哈希表has,用于下次检验,防止重复添加。这就是一个去重的过程,在渲染的时候就不会重复 patch 相同watcher的变化,这样就算同步修改了一百次视图中用到的data,异步 patch 的时候也只会更新最后一次修改。
这里的 waiting 方法是用来标记 flushSchedulerQueue 是否已经传递给 nextTick 的标记位,如果已经传递则只push到队列中不传递 flushSchedulerQueue 给 nextTick,等到 resetSchedulerState 重置调度者状态的时候 waiting 会被置回 false 允许 flushSchedulerQueue 被传递给下一个tick的回调,总之保证了 flushSchedulerQueue 回调在一个tick内只允许被传入一次。
来看看被传递给 nextTick 的回调 flushSchedulerQueue 做了什么:
/**
 * Flush both queues and run the watchers.
 */
function flushSchedulerQueue () {
  currentFlushTimestamp = getNow()
  flushing = true
  let watcher, id

  // Sort queue before flush.
  // This ensures that:
  // 1. Components are updated from parent to child. (because parent is always
  //    created before the child)
  // 2. A component's user watchers are run before its render watcher (because
  //    user watchers are created before the render watcher)
  // 3. If a component is destroyed during a parent component's watcher run,
  //    its watchers can be skipped.
  queue.sort((a, b) => a.id - b.id)

  // do not cache length because more watchers might be pushed
  // as we run existing watchers
  for (index = 0; index < queue.length; index++) {
    watcher = queue[index]
    if (watcher.before) {
      watcher.before()
    }
    id = watcher.id
    has[id] = null
    watcher.run()
    // in dev build, check and stop circular updates.
    if (process.env.NODE_ENV !== 'production' && has[id] != null) {
      circular[id] = (circular[id] || 0) + 1
      if (circular[id] > MAX_UPDATE_COUNT) {
        warn(
          'You may have an infinite update loop ' + (
            watcher.user
              ? `in watcher with expression "${watcher.expression}"`
              : `in a component render function.`
          ),
          watcher.vm
        )
        break
      }
    }
  }

  // keep copies of post queues before resetting state
  const activatedQueue = activatedChildren.slice()
  const updatedQueue = queue.slice()

  resetSchedulerState()

  // call component updated and activated hooks
  callActivatedHooks(activatedQueue)
  callUpdatedHooks(updatedQueue)

  // devtool hook
  /* istanbul ignore if */
  if (devtools && config.devtools) {
    devtools.emit('flush')
  }
}
在 nextTick 方法中执行 flushSchedulerQueue 方法,这个方法挨个执行 queue 中的watcher的 run 方法。我们看到在首先有个 queue.sort() 方法把队列中的watcher按id从小到大排了个序,这样做可以保证:
-
组件更新的顺序是从父组件到子组件的顺序,因为父组件总是比子组件先创建。
-
一个组件的user watchers(侦听器watcher)比render watcher先运行,因为user watchers往往比render watcher更早创建
-
如果一个组件在父组件watcher运行期间被销毁,它的watcher执行将被跳过
在挨个执行队列中的for循环中,index < queue.length 这里没有将length进行缓存,因为在执行处理现有watcher对象期间,更多的watcher对象可能会被push进queue。这期间flushing为true,会执行如下代码:
if (!flushing) {
  queue.push(watcher)
} else { // flushSchedulerQueue运行时调用queueWatcher,走这块逻辑
  // if already flushing, splice the watcher based on its id
  // if already past its id, it will be run next immediately.
  let i = queue.length - 1
  while (i > index && queue[i].id > watcher.id) {
    i--
  }
  queue.splice(i + 1, 0, watcher)
}
新增的watch对象会按照id的大小顺序插入到queue中,如果新增watch对象的id比当前正在执行的watch还要小,则插入当前watch后方,下一个执行。
那么数据的修改从model层反映到view的过程:数据更改 -> setter -> Dep -> Watcher -> nextTick -> patch -> 更新视图
nextTick原理
宏任务/微任务
这里就来看看包含着每个watcher执行的方法被作为回调传入 nextTick 之后,nextTick 对这个方法做了什么。不过首先要了解一下浏览器中的 EventLoop、macro task、micro task几个概念,这里就用一张图来表明一下后两者在主线程中的执行关系:
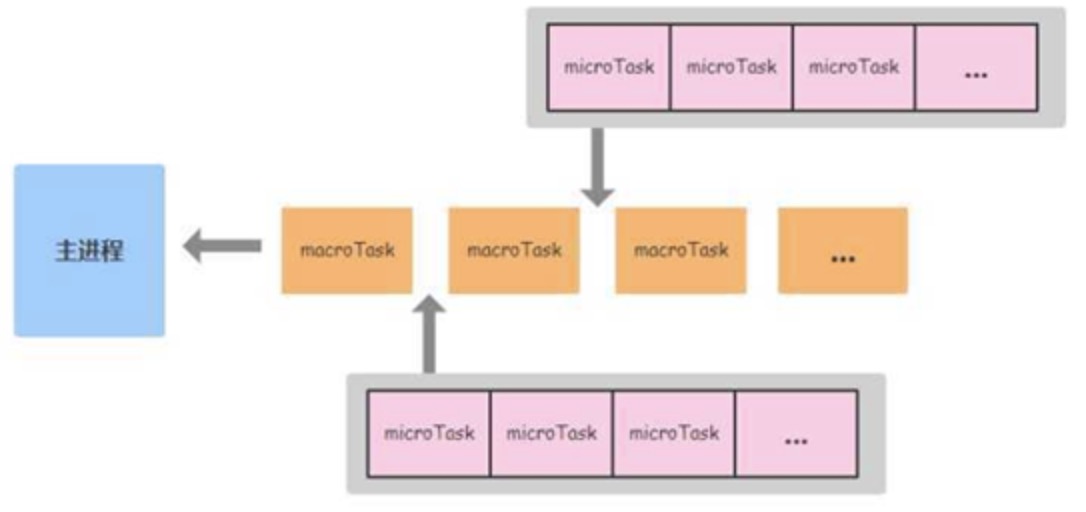
解释一下,当主线程执行完同步任务后:
1,引擎首先从macrotask queue中取出第一个任务,执行完毕后,将microtask queue中的所有任务取出,按顺序全部执行;
2,然后再从macrotask queue中取下一个,执行完毕后,再次将microtask queue中的全部取出;
3,循环往复,直到两个queue中的任务都取完。
浏览器环境中常见的异步任务种类,按照优先级:
macro task :同步代码、setImmediate、MessageChannel、setTimeout/setInterval micro task:Promise.then、MutationObserver
先来看看源码中对 timerFunc 的实现:
export let isUsingMicroTask = false

// Here we have async deferring wrappers using microtasks.
// In 2.5 we used (macro) tasks (in combination with microtasks).
// However, it has subtle problems when state is changed right before repaint
// (e.g. #6813, out-in transitions).
// Also, using (macro) tasks in event handler would cause some weird behaviors
// that cannot be circumvented (e.g. #7109, #7153, #7546, #7834, #8109).
// So we now use microtasks everywhere, again.
// A major drawback of this tradeoff is that there are some scenarios
// where microtasks have too high a priority and fire in between supposedly
// sequential events (e.g. #4521, #6690, which have workarounds)
// or even between bubbling of the same event (#6566).
let timerFunc

// The nextTick behavior leverages the microtask queue, which can be accessed
// via either native Promise.then or MutationObserver.
// MutationObserver has wider support, however it is seriously bugged in
// UIWebView in iOS >= 9.3.3 when triggered in touch event handlers. It
// completely stops working after triggering a few times... so, if native
// Promise is available, we will use it:
/* istanbul ignore next, $flow-disable-line */
if (typeof Promise !== 'undefined' && isNative(Promise)) {
  const p = Promise.resolve()
  timerFunc = () => {
    p.then(flushCallbacks)
    // In problematic UIWebViews, Promise.then doesn't completely break, but
    // it can get stuck in a weird state where callbacks are pushed into the
    // microtask queue but the queue isn't being flushed, until the browser
    // needs to do some other work, e.g. handle a timer. Therefore we can
    // "force" the microtask queue to be flushed by adding an empty timer.
    if (isIOS) setTimeout(noop)
  }
  isUsingMicroTask = true
} else if (!isIE && typeof MutationObserver !== 'undefined' && (
  isNative(MutationObserver) ||
  // PhantomJS and iOS 7.x
  MutationObserver.toString() === '[object MutationObserverConstructor]'
)) {
  // Use MutationObserver where native Promise is not available,
  // e.g. PhantomJS, iOS7, Android 4.4
  // (#6466 MutationObserver is unreliable in IE11)
  let counter = 1
  const observer = new MutationObserver(flushCallbacks)
  const textNode = document.createTextNode(String(counter))
  observer.observe(textNode, {
    characterData: true
  })
  timerFunc = () => {
    counter = (counter + 1) % 2
    textNode.data = String(counter)
  }
  isUsingMicroTask = true
} else if (typeof setImmediate !== 'undefined' && isNative(setImmediate)) {
  // Fallback to setImmediate.
  // Technically it leverages the (macro) task queue,
  // but it is still a better choice than setTimeout.
  timerFunc = () => {
    setImmediate(flushCallbacks)
  }
} else {
  // Fallback to setTimeout.
  timerFunc = () => {
    setTimeout(flushCallbacks, 0)
  }
}
我们根据源码中的注释可以知道,使用微任务或宏任务来实现nextTick函数都存在一定的问题:
-
微任务:微任务的优先级太高,可能会在两个连续事件之间执行(如:#4521、#6690),甚至在同一事件的冒泡过程中执行(如:#6566)
-
宏任务:由于宏任务优先级比较低,我们可以在视图重新渲染前改变状态,这就会有一些微妙的问题(如:#6813)。同样,在事件处理程序中使用宏任务会导致一些不可避免的奇怪行为(例如#7109、#7153、#7546、#7834、#8109)。
在2.5版本之前,vue使用微任务和宏任务结合的方式,默认使用微任务,而v-on绑定的事件触发函数引起的变更使用宏任务。而现在,所有地方都优先使用微任务,只有在微任务的实现方法全都不可用时才会回退到宏任务。
再来分析一下 timerFunc 在不同浏览器兼容性下的平稳退化,或者说降级策略:
-
在promise存在且为原生实现时,使用promise,这里对ios环境下做了一个兼容:添加了一个setTimeout来触发浏览器执行promise。
-
如果promise不支持,则使用MutationObserver。MutationObserver虽然有更广泛的支持,但是它有严重的bug:在UIWebView in iOS >= 9.3.3时,当触摸事件处理程序触发了几次后将会完全停止工作。所以在promise可用时,我们都会使用promise。
-
如果promise和MutationObserver都不支持,则会回退到宏任务:setImmediate、setTimeout,这里setImmediate的优先级会比setTimeout高。
nextTick实现
最后来看看我们平常用到的 nextTick 方法到底是如何实现的:
const callbacks = []
let pending = false

function flushCallbacks () {
  pending = false
  const copies = callbacks.slice(0)
  callbacks.length = 0
  for (let i = 0; i < copies.length; i++) {
    copies[i]()
  }
}

export function nextTick (cb?: Function, ctx?: Object) {
  let _resolve
  callbacks.push(() => {
    if (cb) {
      try {
        cb.call(ctx)
      } catch (e) {
        handleError(e, ctx, 'nextTick')
      }
    } else if (_resolve) {
      _resolve(ctx)
    }
  })
  if (!pending) {
    pending = true
    timerFunc()
  }
  // $flow-disable-line
  if (!cb && typeof Promise !== 'undefined') {
    return new Promise(resolve => {
      _resolve = resolve
    })
  }
}
nextTick 在这里分为三个部分,我们一起来看一下:
-
首先 nextTick 把传入的 cb 回调函数用 try-catch 包裹后放在一个匿名函数中推入callbacks数组中,这么做是因为防止单个 cb 如果执行错误不至于让整个JS线程挂掉,每个 cb 都包裹是防止这些回调函数如果执行错误不会相互影响,比如前一个抛错了后一个仍然可以执行。
-
然后检查 pending 状态,这个跟之前介绍的 queueWatcher 中的 waiting 是一个意思,它是一个标记位,一开始是 false,在进入 timerFunc 方法前被置为 true,因此下次调用 nextTick 就不会进入 timerFunc 方法。这flushCallbacks会在下一个 tick 时候异步的去执行callbacks队列中收集的任务,而 flushCallbacks 方法在执行一开始会把 pending 置 false,因此下一次调用 nextTick 时候又能开启新一轮的 timerFunc,这样就形成了vue中的 event loop。
-
最后检查是否传入了 cb,因为 nextTick 还支持Promise化的调用:
nextTick().then(() => {}),所以如果没有传入 cb 就直接return了一个Promise实例,并且把resolve传递给_resolve,这样后者执行的时候就跳到我们调用的时候传递进 then 的方法中。
一个例子
<div id="app">
  <span id='name' ref='name'></span>
  <button @click='change'>change name</button>
</div>
<script>
  new Vue({
    el: '#app',
    data() {
      return {
        name: 'lyc'
      }
    },
    methods: {
      change() {
        const $name = this.$refs.name
        this.$nextTick(() => console.log('setter前:' + $name.innerHTML))
        this.name = ' name改喽 '
        console.log('同步方式:' + this.$refs.name.innerHTML)
        setTimeout(() => this.console("setTimeout方式:" + this.$refs.name.innerHTML))
        this.$nextTick().then(() => console.log('Promise方式:' + $name.innerHTML))
        this.$nextTick(() => console.log('setter后:' + $name.innerHTML))
      }
    }
  })
</script>
执行以下看看结果:
同步方式: lyc
setter前: lyc
setter后: name改喽
Promise方式: name改喽
setTimeout方式: name改喽
为什么是这样的结果呢,解释一下:
-
同步方式: 当把data中的name修改之后,此时会触发name的 setter 中的
dep.notify通知依赖本data的render watcher去 update,update 会把 flushSchedulerQueue 函数传递给 nextTick,render watcher在 flushSchedulerQueue 函数运行时watcher.run再走 diff -> patch 那一套重渲染 re-render 视图,这个过程中会重新依赖收集,这个过程是异步的;所以当我们直接修改了name之后打印,这时异步的改动还没有被 patch 到视图上,所以获取视图上的DOM元素还是原来的内容。 -
setter前: setter前为什么还打印原来的是原来内容呢,是因为 nextTick 在被调用的时候把回调挨个push进callbacks数组,之后执行的时候也是 for 循环出来挨个执行,所以是类似于队列这样一个概念,先入先出;在修改name之后,触发把render watcher填入 schedulerQueue 队列并把他的执行函数 flushSchedulerQueue 传递给 nextTick ,此时callbacks队列中已经有了 setter前函数 了,因为这个 cb 是在 setter前函数 之后被push进callbacks队列的,那么先入先出的执行callbacks中回调的时候先执行 setter前函数,这时并未执行render watcher的
watcher.run,所以打印DOM元素仍然是原来的内容。 -
setter后: setter后这时已经执行完 flushSchedulerQueue,这时render watcher已经把改动 patch 到视图上,所以此时获取DOM是改过之后的内容。
-
Promise方式: 这里 Promise方式 明明在 setter后 方式之前加入callbacks数组,为什么却在之后打印:确实是 Promise方式 先执行,但执行以后只是把闭包中的Promise置为reselve,而该promise.then的回调函数会被push到当前微任务队列的末尾,也就会在flushCallbacks函数执行完后执行(这里默认timerFunc使用微任务实现)。
-
setTimeout方式: 最后执行macro task的任务,此时DOM已经更改。
注意,在执行 setter前函数 这个异步任务之前,同步的代码已经执行完毕,异步的任务都还未执行,所有的 $nextTick 函数也执行完毕,所有回调都被push进了callbacks队列中等待执行,所以在 setter前函数 执行的时候,此时callbacks队列是这样的:[setter前函数,flushSchedulerQueue,Promise方式函数, setter后函数],它是一个micro task队列,执行完毕之后执行macro task setTimeout,所以打印出上面的结果。
小结
-
queue数组里是因为数据变动触发更新的watch对象,flushSchedulerQueue函数依次执行queue数组中watch对象的
run()方法。在flushSchedulerQueue函数执行结束后,数据的变动才能再次触发新的flushSchedulerQueue函数,而函数执行结束之前,数据变动产生的watch对象会push到当前的queue数组中。 -
callbacks数组里是
$nextTick函数调用时传入的函数,flushCallbacks函数依次执行callbacks数组,只要flushCallbacks函数开始执行,再次调用$nextTick方法,会产生新的callbacks数组,即产生一个新的微/宏任务。
queue: [watch1, watch2, watch3] // flushSchedulerQueue函数执行这个数组
// 通过$nextTick(flushSchedulerQueue),传入callbacks中
callbacks: [`$nextTick传入函数1`,flushSchedulerQueue函数,`$nextTick传入函数2`]
compile 模板编译
由于 compile 编译以及接下来的 patch 差异更新源码逻辑较为复杂,为了方便大家更简单的了解这一块的逻辑,会省略源码中的一些分支逻辑,并且一些地方会采用伪代码。建议大家看完本文对这一块有了初步的了解之后再去看源码,这样效果会更加好。
compile 编译可以分成 parse、optimize 与 generate 三个阶段,最终需要得到 render function。
由于解析过程比较复杂,直接上代码可能会导致不了解这部分内容的同学一头雾水。所以笔者准备提供一个 template 的示例,通过这个示例的变化来看解析的过程。但是解析的过程及结果都是将最重要的部分抽离出来展示,希望能让读者更好地了解其核心部分的实现。
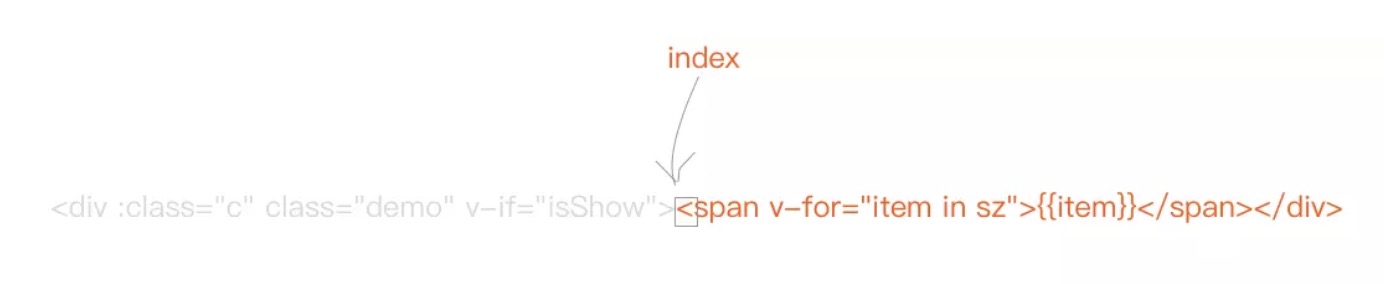
<div :class="c" class="demo" v-if="isShow">
    <span v-for="item in sz"></span>
</div>
var html = '<div :class="c" class="demo" v-if="isShow"><span v-for="item in sz"></span></div>';
接下来的过程都会依赖这个示例来进行。
parse
首先是 parse,parse 会用正则等方式将 template 模板中进行字符串解析,得到指令、class、style等数据,形成 AST。
这个过程比较复杂,会涉及到比较多的正则进行字符串解析,我们来看一下得到的 AST 的样子。
{
    /* 标签属性的map,记录了标签上属性 */
    'attrsMap': {
        ':class': 'c',
        'class': 'demo',
        'v-if': 'isShow'
    },
    /* 解析得到的:class */
    'classBinding': 'c',
    /* 标签属性v-if */
    'if': 'isShow',
    /* v-if的条件 */
    'ifConditions': [
        {
            'exp': 'isShow'
        }
    ],
    /* 标签属性class */
    'staticClass': 'demo',
    /* 标签的tag */
    'tag': 'div',
    /* 子标签数组 */
    'children': [
        {
            'attrsMap': {
                'v-for': "item in sz"
            },
            /* for循环的参数 */
            'alias': "item",
            /* for循环的对象 */
            'for': 'sz',
            /* for循环是否已经被处理的标记位 */
            'forProcessed': true,
            'tag': 'span',
            'children': [
                {
                    /* 表达式,_s是一个转字符串的函数 */
                    'expression': '_s(item)',
                    'text': ''
                }
            ]
        }
    ]
}
最终得到的 AST 通过一些特定的属性,能够比较清晰地描述出标签的属性以及依赖关系。
接下来我们用代码来讲解一下如何使用正则来把 template 编译成我们需要的 AST 的。
正则
首先我们定义一下接下来我们会用到的正则。
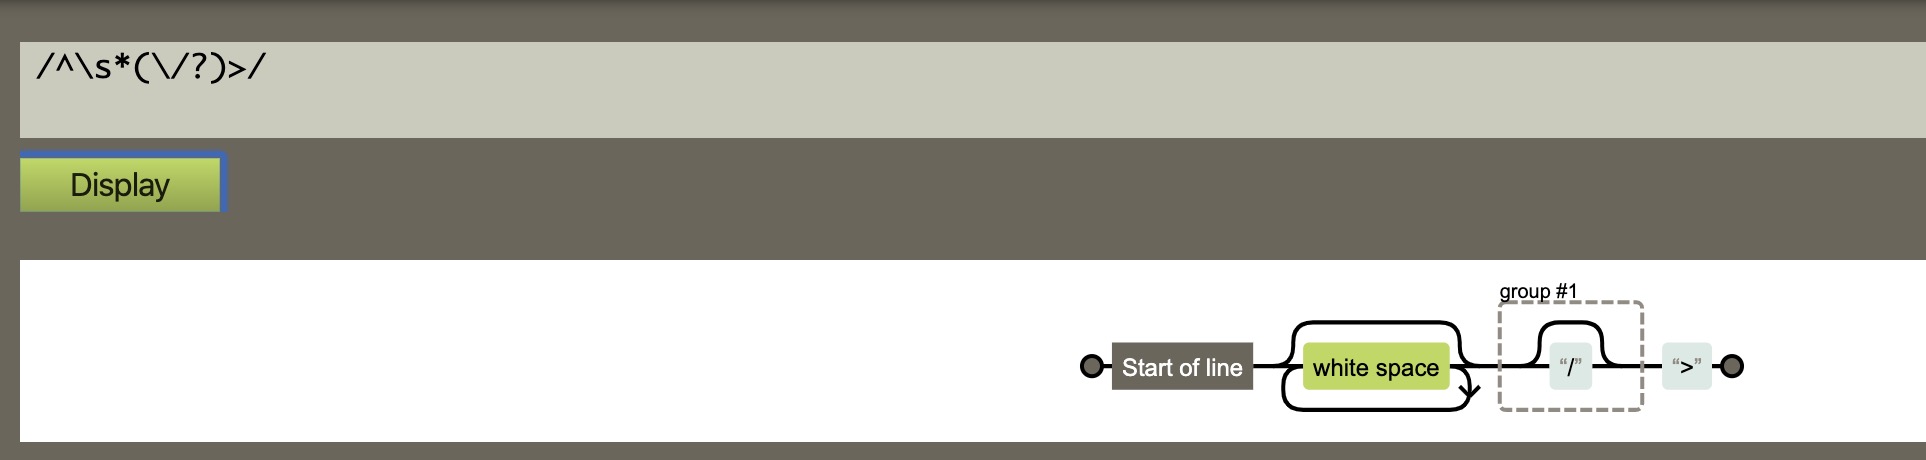
const ncname = '[a-zA-Z_][\\w\\-\\.]*';
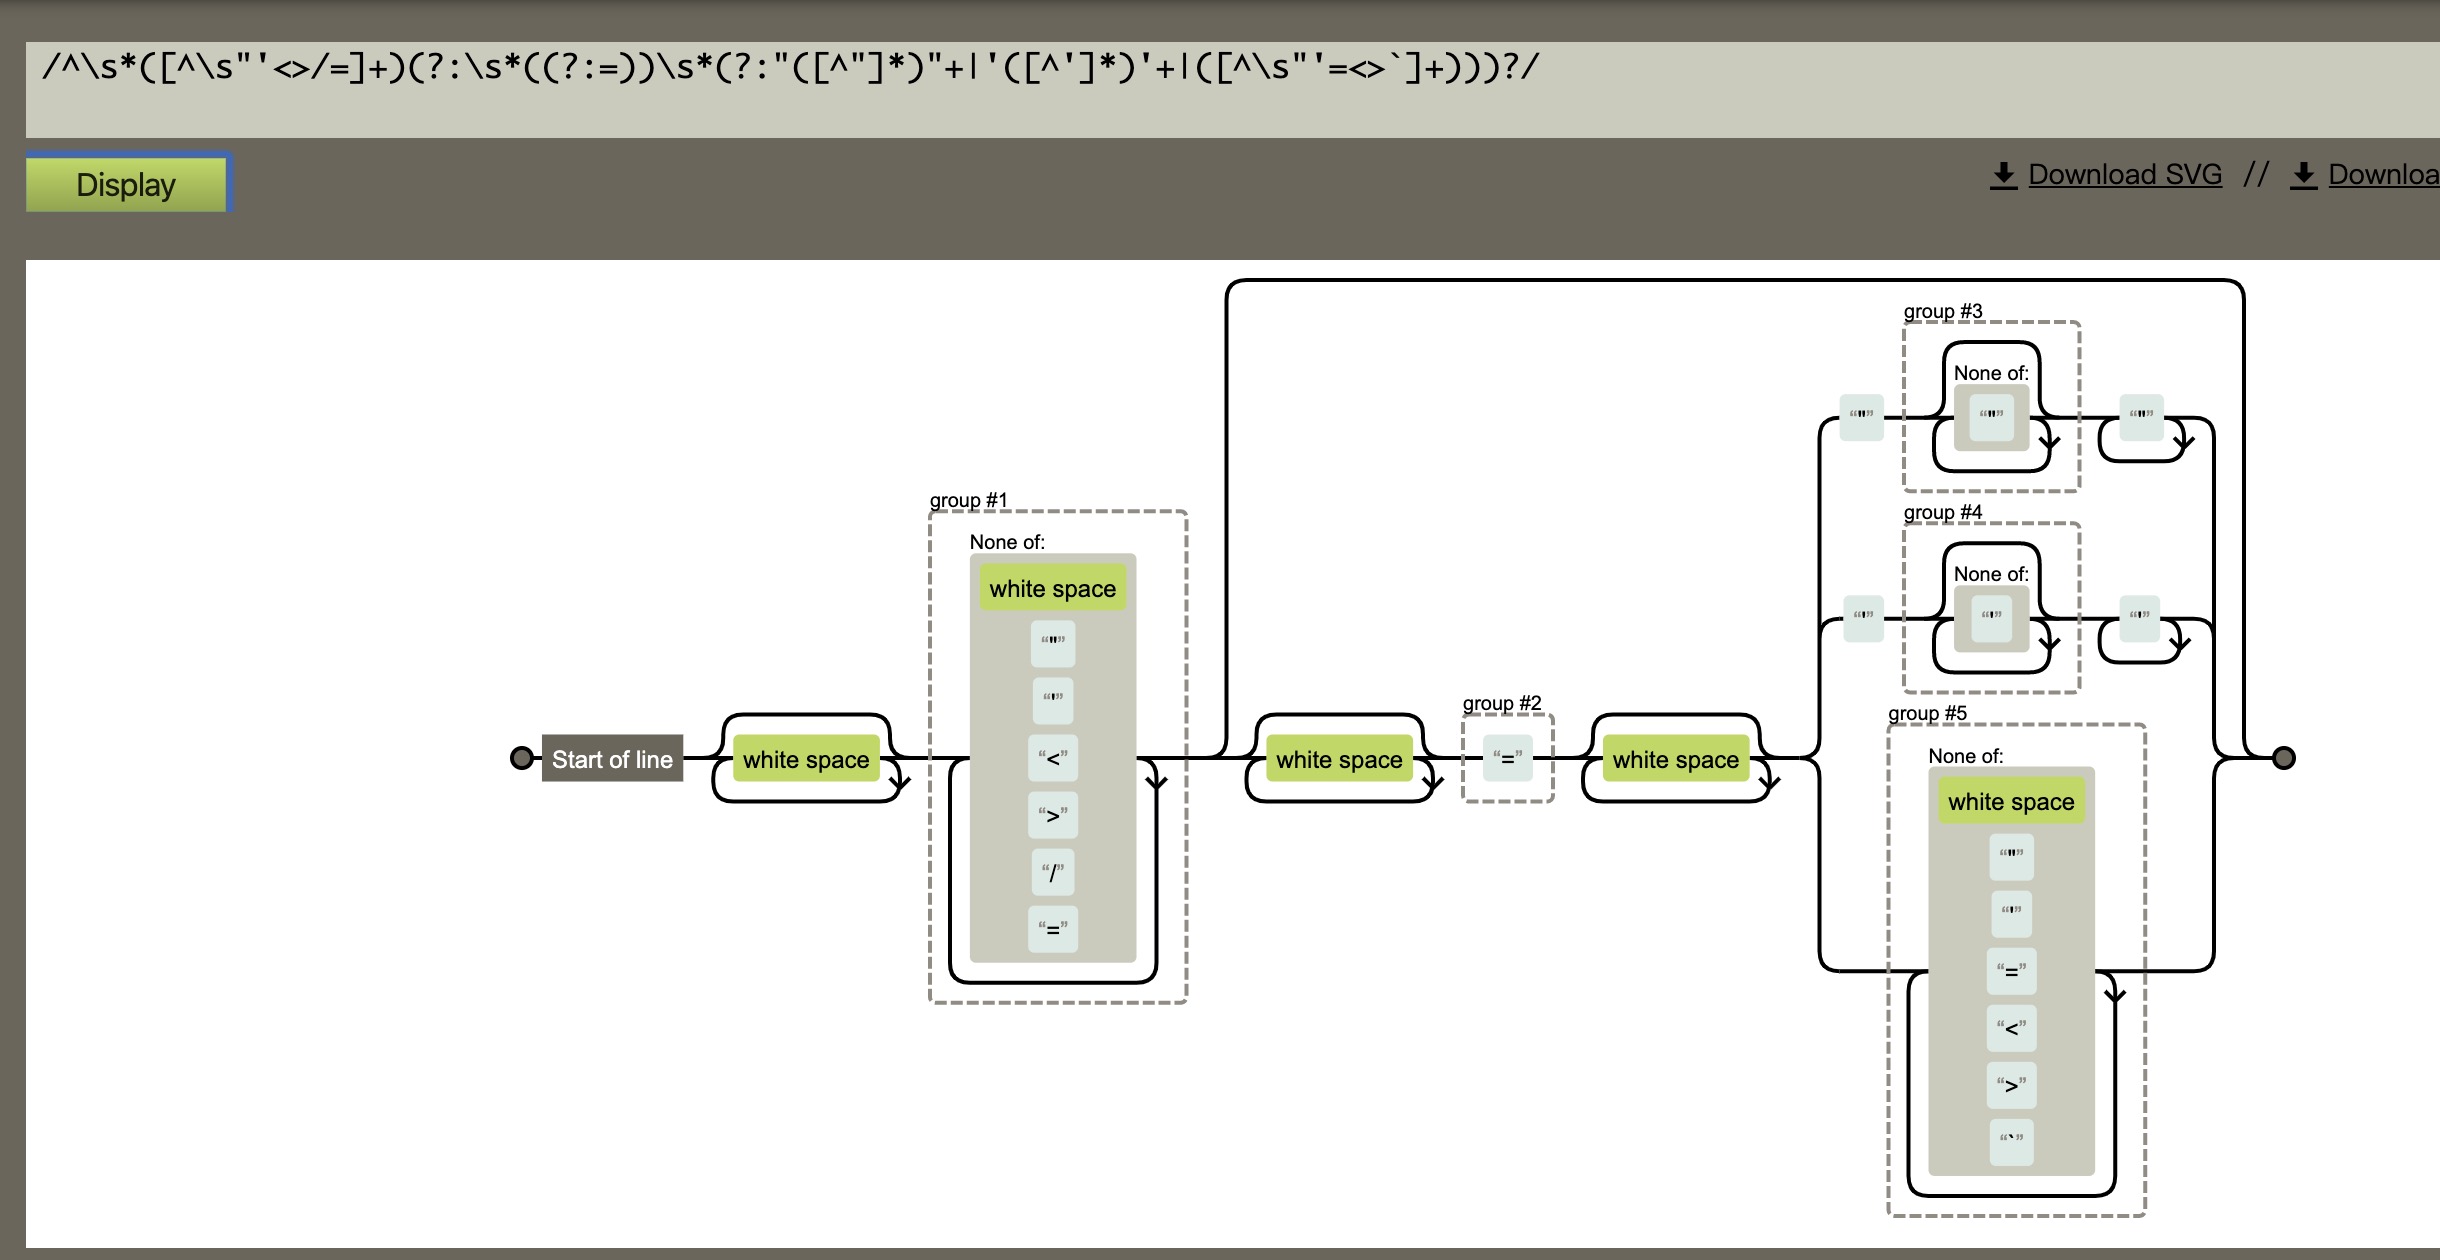
const singleAttrIdentifier = /([^\s"'<>/=]+)/
const singleAttrAssign = /(?:=)/
const singleAttrValues = [
/"([^"]*)"+/.source,
/'([^']*)'+/.source,
/([^\s"'=<>`]+)/.source
]
const attribute = new RegExp(
'^\\s*' + singleAttrIdentifier.source +
'(?:\\s*(' + singleAttrAssign.source + ')' +
'\\s*(?:' + singleAttrValues.join('|') + '))?'
)
const qnameCapture = '((?:' + ncname + '\\:)?' + ncname + ')'
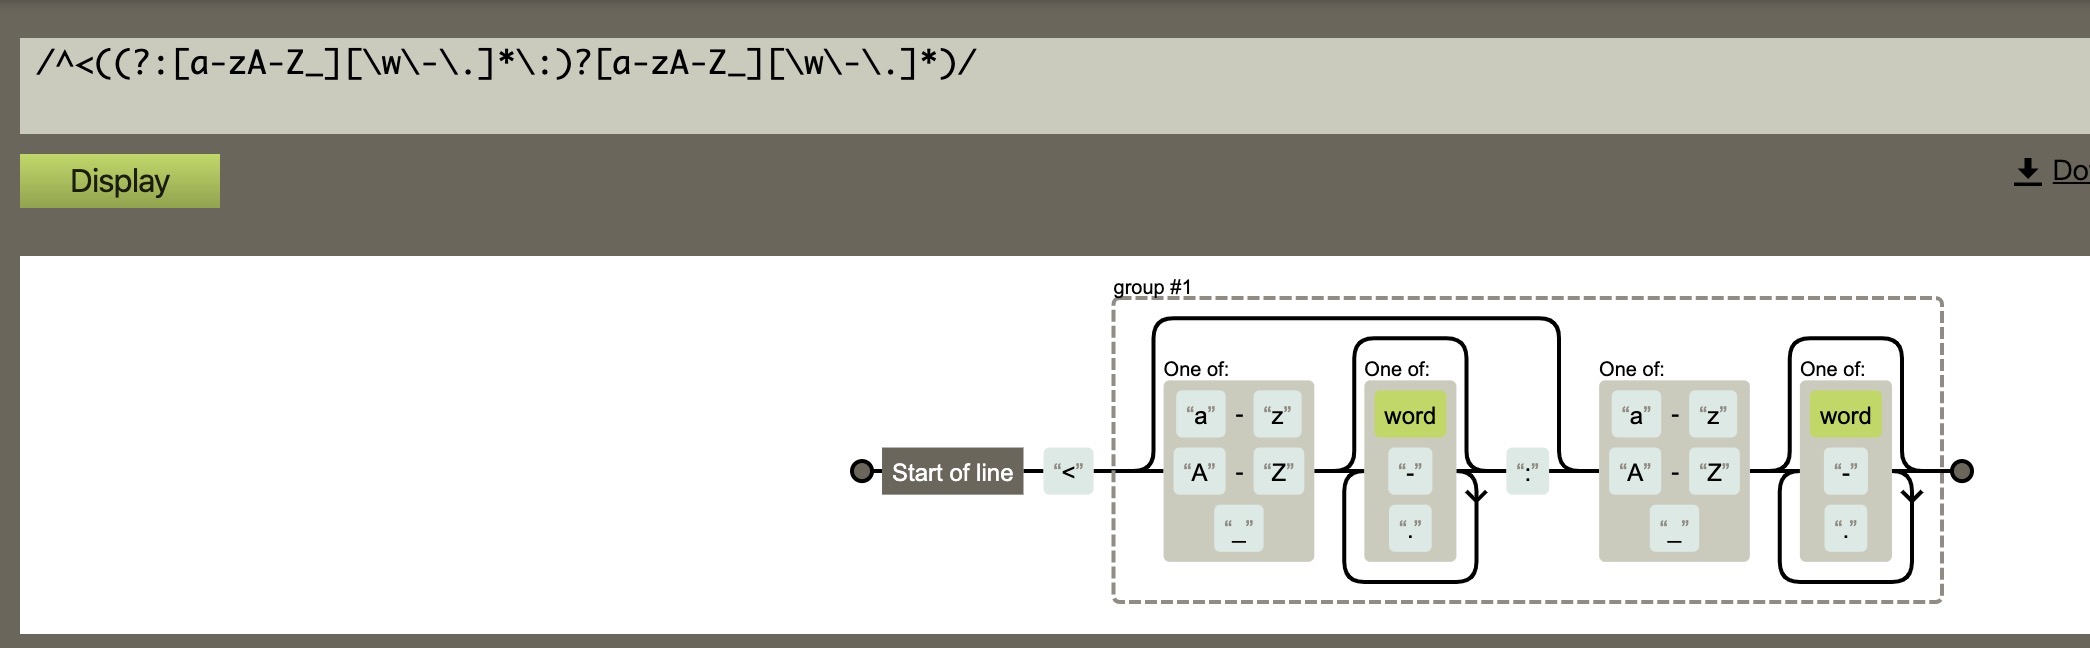
const startTagOpen = new RegExp('^<' + qnameCapture)
const startTagClose = /^\s*(\/?)>/
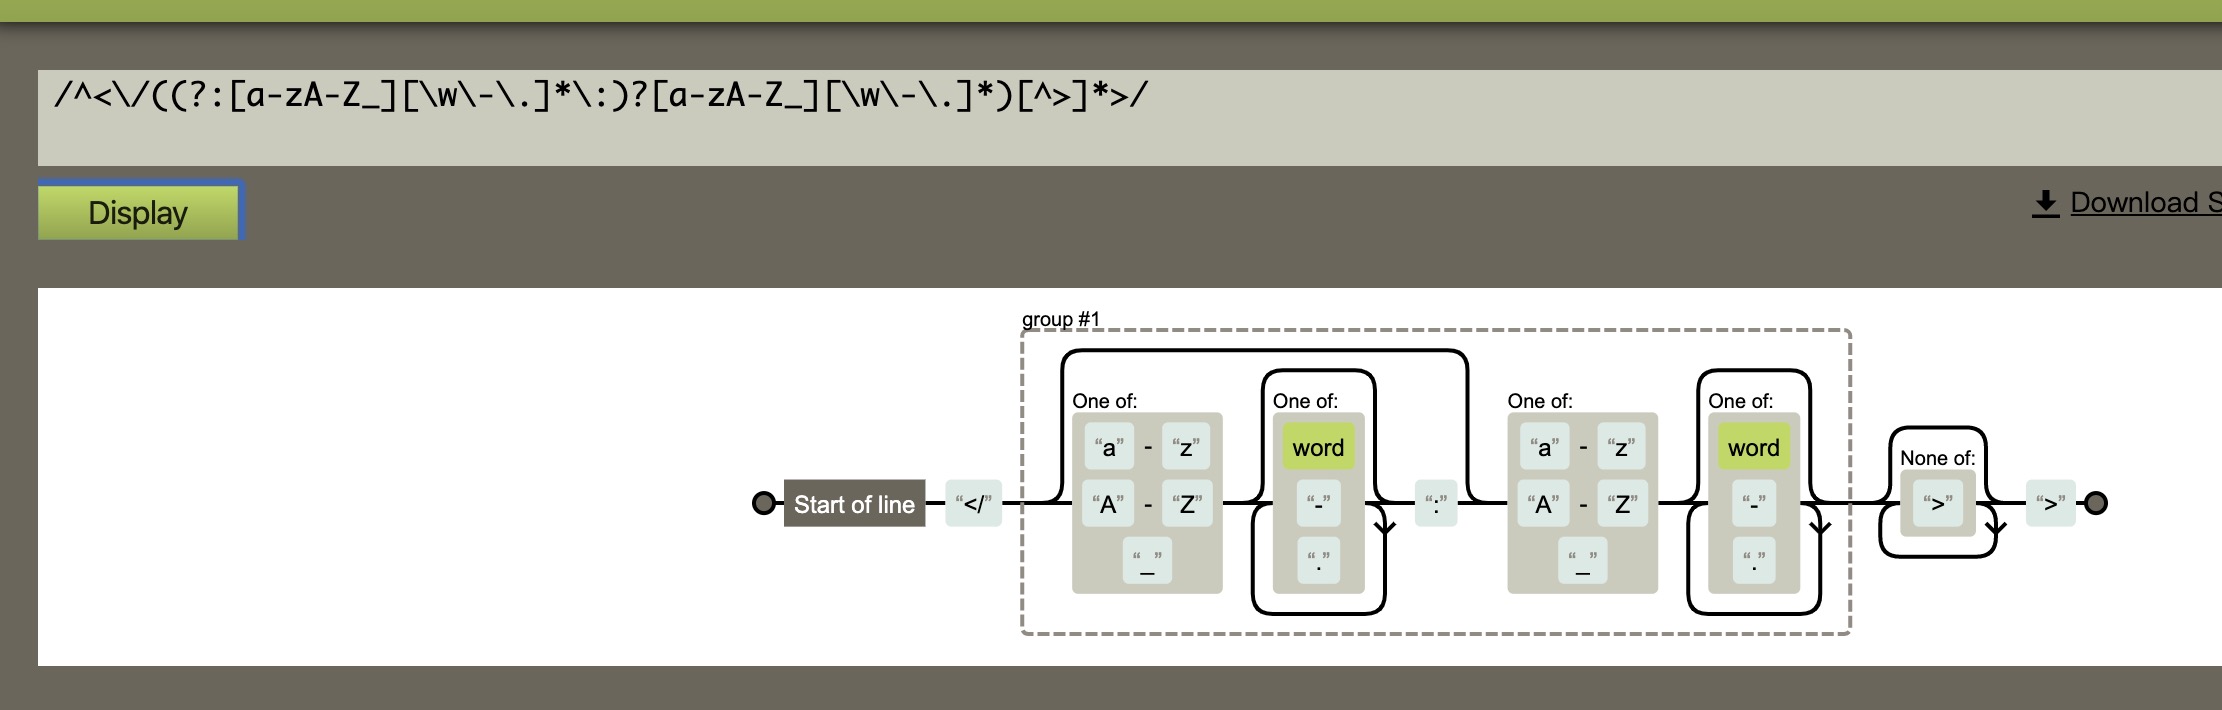
const endTag = new RegExp('^<\\/' + qnameCapture + '[^>]*>')
const defaultTagRE = /\{\{((?:.|\n)+?)\}\}/g
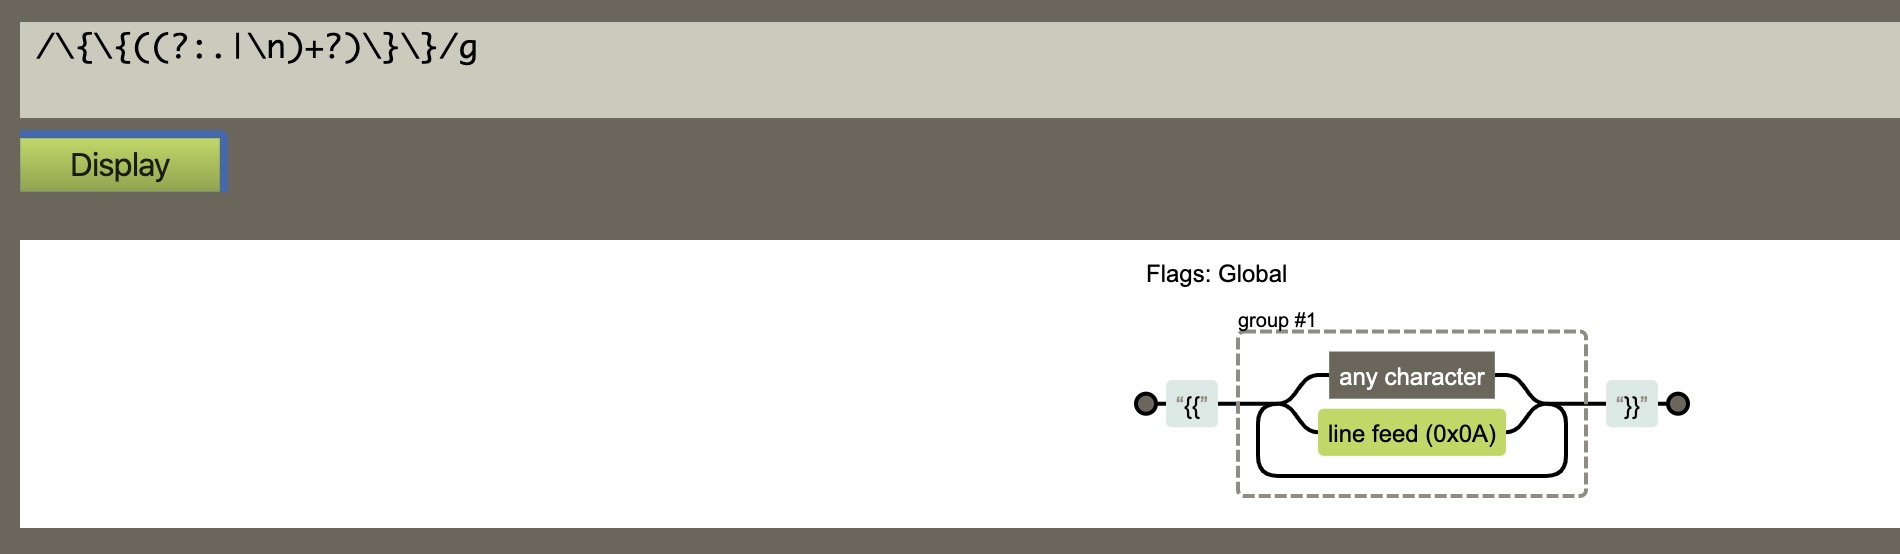
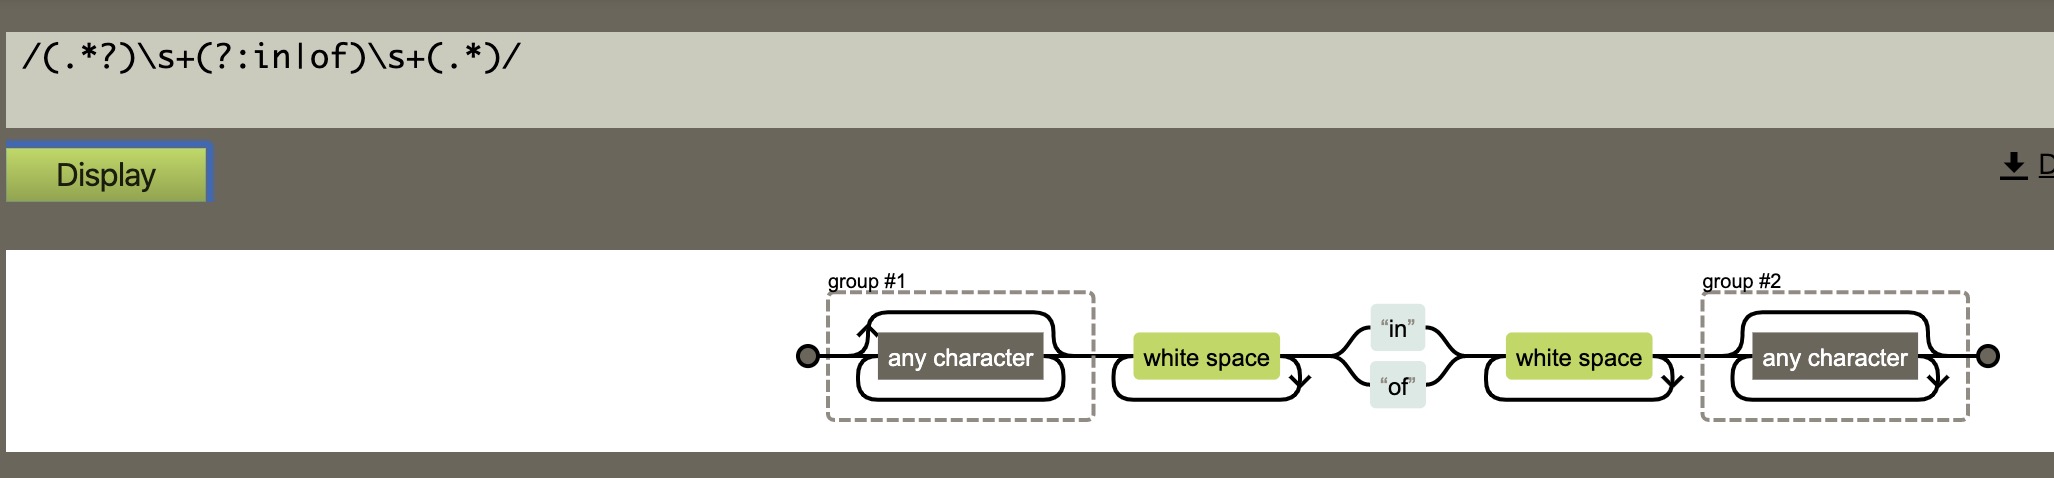
const forAliasRE = /(.*?)\s+(?:in|of)\s+(.*)/
其中需要注意的点:
-
(?:exp)是 非捕获分组,预搜索时可以指定匹配的结果包括或不包括预搜索内容 - js正则默认是贪婪模式,如果想将贪婪模式改为非贪婪模式,可以在量词符后面加一个问号:
- *?:表示某个模式出现0次或多次,匹配时采用非贪婪模式。
- +?:表示某个模式出现1次或多次,匹配时采用非贪婪模式
\w元字符用于查找单词字符。单词字符包括:a-z、A-Z、0-9,以及下划线
至于具体正则匹配规则我们在用到的时候再分析。
advance
因为我们解析 template 采用循环进行字符串匹配的方式,所以每匹配解析完一段我们需要将已经匹配掉的去掉,头部的指针指向接下来需要匹配的部分。
function advance (n) {
    index += n
    html = html.substring(n)
}
举个例子,当我们把第一个 div 的头标签全部匹配完毕以后,我们需要将这部分除去,也就是向右移动 43 个字符。

调用 advance 函数
advance(43);
得到结果
parseHTML
首先我们需要定义个 parseHTML 函数,在里面我们循环解析 template 字符串。
function parseHTML () {
    while(html) {
        let textEnd = html.indexOf('<');
        if (textEnd === 0) {
            if (html.match(endTag)) {
                //...process end tag
                continue;
            }
            if (html.match(startTagOpen)) {
                //...process start tag
                continue;
            }
        } else {
            //...process text
            continue;
        }
    }
}
parseHTML 会用 while 来循环解析 template ,用正则在匹配到标签头、标签尾以及文本的时候分别进行不同的处理。直到整个 template 被解析完毕。
parseStartTag
我们来写一个 parseStartTag 函数,用来解析起始标签("<div :class="c" class="demo" v-if="isShow">"部分的内容)。
function parseStartTag () {
    const start = html.match(startTagOpen);
    if (start) {
        const match = {
            tagName: start[1],
            attrs: [],
            start: index
        }
        advance(start[0].length);

        let end, attr
        while (!(end = html.match(startTagClose)) && (attr = html.match(attribute))) {
            advance(attr[0].length)
            match.attrs.push({
                name: attr[1],
                value: attr[3]
            });
        }
        if (end) {
            match.unarySlash = end[1];
            advance(end[0].length);
            match.end = index;
            return match
        }
    }
}
首先用 startTagOpen 正则得到标签的头部,可以得到 tagName(标签名称),同时我们需要一个数组 attrs 用来存放标签内的属性。
const start = html.match(startTagOpen);
const match = {
    tagName: start[1],
    attrs: [],
    start: index
}
advance(start[0].length);
其中 startTagOpen 匹配规则如下:
接下来使用 startTagClose 与 attribute 两个正则分别用来解析标签结束以及标签内的属性。这段代码用 while 循环一直到匹配到 startTagClose 为止,解析内部所有的属性。
let end, attr
while (!(end = html.match(startTagClose)) && (attr = html.match(attribute))) {
    advance(attr[0].length)
    match.attrs.push({
        name: attr[1],
        value: attr[3]
    });
}
if (end) {
    match.unarySlash = end[1];
    advance(end[0].length);
    match.end = index;
    return match
}
其中 startTagClose 与 attribute 匹配规则如下:
stack
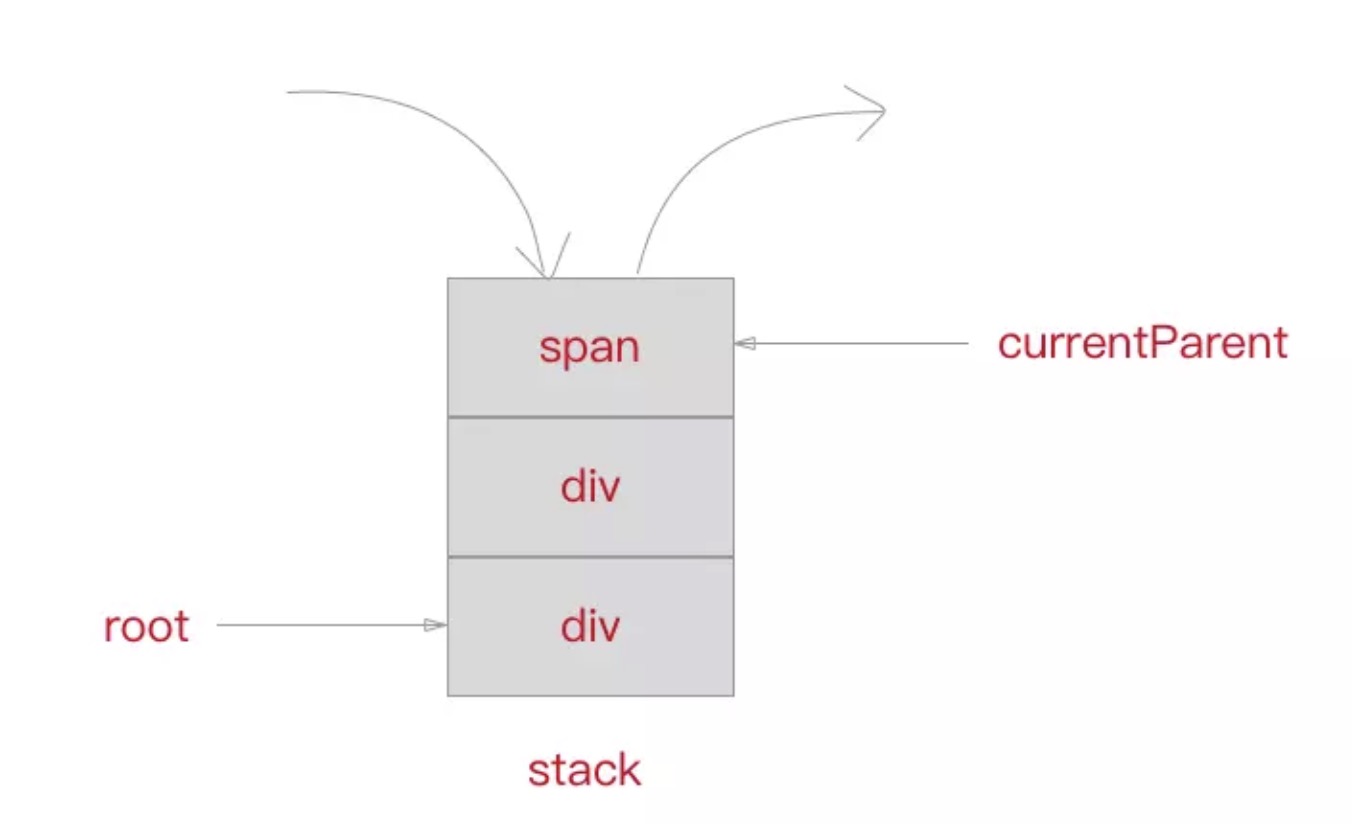
此外,我们需要维护一个 stack 栈来保存已经解析好的标签头,这样我们可以根据在解析尾部标签的时候得到所属的层级关系以及父标签。同时我们定义一个 currentParent 变量用来存放当前标签的父标签节点的引用, root 变量用来指向根标签节点。
const stack = [];
let currentParent, root;
知道这个以后,我们优化一下 parseHTML ,在 startTagOpen 的 if 逻辑中加上新的处理。
if (html.match(startTagOpen)) {
    const startTagMatch = parseStartTag();
    const element = {
        type: 1,
        tag: startTagMatch.tagName,
        lowerCasedTag: startTagMatch.tagName.toLowerCase(),
        attrsList: startTagMatch.attrs,
        attrsMap: makeAttrsMap(startTagMatch.attrs),
        parent: currentParent,
        children: []
    }

    if(!root){
        root = element
    }

    if(currentParent){
        currentParent.children.push(element);
    }

    stack.push(element);
    currentParent = element;
    continue;
}
我们将 startTagMatch 得到的结果首先封装成 element ,这个就是最终形成的 AST 的节点,标签节点的 type 为 1。
const startTagMatch = parseStartTag();
const element = {
    type: 1,
    tag: startTagMatch.tagName,
    attrsList: startTagMatch.attrs,
    attrsMap: makeAttrsMap(startTagMatch.attrs),
    parent: currentParent,
    children: []
}
然后让 root 指向根节点的引用。
if(!root){
    root = element
}
接着我们将当前节点的 element 放入父节点 currentParent 的 children 数组中。
if(currentParent){
    currentParent.children.push(element);
}
最后将当前节点 element 压入 stack 栈中,并将 currentParent 指向当前节点,因为接下去下一个解析如果还是头标签或者是文本的话,会成为当前节点的子节点,如果是尾标签的话,那么将会从栈中取出当前节点,这种情况我们接下来要讲。
stack.push(element);
currentParent = element;
continue;
其中的 makeAttrsMap 是将 attrs 转换成 map 格式的一个方法。
function makeAttrsMap (attrs) {
    const map = {}
    for (let i = 0, l = attrs.length; i < l; i++) {
        map[attrs[i].name] = attrs[i].value;
    }
    return map
}
parseEndTag
同样,我们在 parseHTML 中加入对尾标签的解析函数,为了匹配如</div>。
const endTagMatch = html.match(endTag)
 if (endTagMatch) {
    advance(endTagMatch[0].length);
    parseEndTag(endTagMatch[1]);
    continue;
}
用 parseEndTag 来解析尾标签,它会从 stack 栈中取出最近的跟自己标签名一致的那个元素,将 currentParent 指向那个元素,并将该元素之前的元素都从 stack 中出栈。
其中 endTag 匹配规则如下:
这里可能有同学会问,难道解析的尾元素不应该对应 stack 栈的最上面的一个元素才对吗?
其实不然,比如说可能会存在自闭合的标签,如<br />,或者是写了<span>但是没有加上< /span>的情况,这时候就要找到 stack 中的第二个位置才能找到同名标签。
function parseEndTag (tagName) {
    let pos;
    for (pos = stack.length - 1; pos >= 0; pos--) {
        if (stack[pos].lowerCasedTag === tagName.toLowerCase()) {
            break;
        }
    }

    if (pos >= 0) {
        stack.length = pos;
        currentParent = stack[pos - 1];
    }
}
parseText
最后是解析文本,这个比较简单,只需要将文本取出,然后有两种情况,一种是普通的文本,直接构建一个节点 push 进当前 currentParent 的 children 中即可。还有一种情况是文本是如``这样的 Vue 的表达式,这时候我们需要用 parseText 来将表达式转化成代码。
text = html.substring(0, textEnd)
advance(textEnd)
let expression;
if (expression = parseText(text)) {
    currentParent.children.push({
        type: 2,
        text,
        expression
    });
} else {
    currentParent.children.push({
        type: 3,
        text,
    });
}
continue;
我们会用到一个 parseText 函数。
function parseText (text) {
    if (!defaultTagRE.test(text)) return;

    const tokens = [];
    let lastIndex = defaultTagRE.lastIndex = 0
    let match, index
    while ((match = defaultTagRE.exec(text))) {
        index = match.index

        if (index > lastIndex) {
            tokens.push(JSON.stringify(text.slice(lastIndex, index)))
        }

        const exp = match[1].trim()
        tokens.push(`_s(${exp})`)
        lastIndex = index + match[0].length
    }

    if (lastIndex < text.length) {
        tokens.push(JSON.stringify(text.slice(lastIndex)))
    }
    return tokens.join('+');
}
其中 defaultTagRE 匹配规则如下:
我们使用一个 tokens 数组来存放解析结果,通过 defaultTagRE 来循环匹配该文本,如果是普通文本直接 push 到 tokens 数组中去,如果是表达式``,则转化成_s(${exp})的形式。
举个例子,如果我们有这样一个文本。
<div>hello,.</div>
最终得到 tokens。
tokens = ['hello,', _s(name), '.'];
最终通过 join 返回表达式。
'hello' + _s(name) + '.';
processIf与processFor
最后介绍一下如何处理v-if以及v-for这样的 Vue 的表达式的,这里我们只简单介绍两个示例中用到的表达式解析。
我们只需要在解析头标签的内容中加入这两个表达式的解析函数即可,在这时v-for之类指令已经在属性解析时存入了 attrsMap 中了。
if (html.match(startTagOpen)) {
    const startTagMatch = parseStartTag();
    const element = {
        type: 1,
        tag: startTagMatch.tagName,
        attrsList: startTagMatch.attrs,
        attrsMap: makeAttrsMap(startTagMatch.attrs),
        parent: currentParent,
        children: []
    }

    processIf(element);
    processFor(element);

    if(!root){
        root = element
    }

    if(currentParent){
        currentParent.children.push(element);
    }

    stack.push(element);
    currentParent = element;
    continue;
}
首先我们需要定义一个 getAndRemoveAttr 函数,用来从 el 的 attrsMap 属性或是 attrsList 属性中取出 name 对应值。
function getAndRemoveAttr (el, name) {
    let val
    if ((val = el.attrsMap[name]) != null) {
        const list = el.attrsList
        for (let i = 0, l = list.length; i < l; i++) {
            if (list[i].name === name) {
                list.splice(i, 1)
                break
            }
        }
    }
    return val
}
比如说解析示例的 div 标签属性。
getAndRemoveAttr(el, 'v-for');
可有得到item in sz。
有了这个函数这样我们就可以开始实现 processFor 与 processIf 了。
v-for会将指令解析成 for 属性以及 alias 属性,而v-if会将条件都存入 ifConditions 数组中。
function processFor (el) {
    let exp;
    if ((exp = getAndRemoveAttr(el, 'v-for'))) {
        const inMatch = exp.match(forAliasRE);
        el.for = inMatch[2].trim();
        el.alias = inMatch[1].trim();
    }
}

function processIf (el) {
    const exp = getAndRemoveAttr(el, 'v-if');
    if (exp) {
        el.if = exp;
        if (!el.ifConditions) {
            el.ifConditions = [];
        }
        el.ifConditions.push({
            exp: exp,
            block: el
        });
    }
}
其中 forAliasRE 匹配规则如下:
到这里,我们已经把 parse 的过程介绍完了,接下来看一下 optimize。
optimize
optimize 主要作用就跟它的名字一样,用作「优化」。
这个涉及到后面要讲 patch 的过程,因为 patch 的过程实际上是将 VNode 节点进行一层一层的比对,然后将「差异」更新到视图上。那么一些静态节点是不会根据数据变化而产生变化的,这些节点我们没有比对的需求,是不是可以跳过这些静态节点的比对,从而节省一些性能呢?
那么我们就需要为静态的节点做上一些「标记」,在 patch 的时候我们就可以直接跳过这些被标记的节点的比对,从而达到「优化」的目的。
经过 optimize 这层的处理,每个节点会加上 static 属性,用来标记是否是静态的。
得到如下结果。
{
    'attrsMap': {
        ':class': 'c',
        'class': 'demo',
        'v-if': 'isShow'
    },
    'classBinding': 'c',
    'if': 'isShow',
    'ifConditions': [
        'exp': 'isShow'
    ],
    'staticClass': 'demo',
    'tag': 'div',
    /* 静态标志 */
    'static': false,
    'children': [
        {
            'attrsMap': {
                'v-for': "item in sz"
            },
            'static': false,
            'alias': "item",
            'for': 'sz',
            'forProcessed': true,
            'tag': 'span',
            'children': [
                {
                    'expression': '_s(item)',
                    'text': '',
                    'static': false
                }
            ]
        }
    ]
}
我们用代码实现一下 optimize 函数。
isStatic
首先实现一个 isStatic 函数,传入一个 node 判断该 node 是否是静态节点。判断的标准是当 type 为 2(表达式节点)则是非静态节点,当 type 为 3(文本节点)的时候则是静态节点,当然,如果存在 if 或者 for这样的条件的时候(表达式节点),也是非静态节点。
function isStatic (node) {
    if (node.type === 2) {
        return false
    }
    if (node.type === 3) {
        return true
    }
    return (!node.if && !node.for);
}
markStatic
markStatic 为所有的节点标记上 static,遍历所有节点通过 isStatic 来判断当前节点是否是静态节点,此外,会遍历当前节点的所有子节点,如果子节点是非静态节点,那么当前节点也是非静态节点。
function markStatic (node) {
    node.static = isStatic(node);
    if (node.type === 1) {
        for (let i = 0, l = node.children.length; i < l; i++) {
            const child = node.children[i];
            markStatic(child);
            if (!child.static) {
                node.static = false;
            }
        }
    }
}
markStaticRoots
接下来是 markStaticRoots 函数,用来标记 staticRoot(静态根)。这个函数实现比较简单,简单来将就是如果当前节点是静态节点,同时满足该节点并不是只有一个文本节点左右子节点(作者认为这种情况的优化消耗会大于收益)时,标记 staticRoot 为 true,否则为 false。
function markStaticRoots (node) {
    if (node.type === 1) {
        if (node.static && node.children.length && !(
        node.children.length === 1 &&
        node.children[0].type === 3
        )) {
            node.staticRoot = true;
            return;
        } else {
            node.staticRoot = false;
        }
        if (node.children) {
          for (let i = 0, l = node.children.length; i < l; i++) {
            markStaticRoots(node.children[i])
          }
        }
    }
}
optimize
有了以上的函数,就可以实现 optimize 了。
function optimize (rootAst) {
    markStatic(rootAst);
    markStaticRoots(rootAst);
}
generate
generate 会将 AST 转化成 render funtion 字符串,最终得到 render 的字符串以及 staticRenderFns 字符串。
首先带大家感受一下真实的 Vue 编译得到的结果。
with(this){
    return (isShow) ?
    _c(
        'div',
        {
            staticClass: "demo",
            class: c
        },
        _l(
            (sz),
            function(item){
                return _c('span',[_v(_s(item))])
            }
        )
    )
    : _e()
}
看到这里可能会纳闷了,这些 _c,_l 到底是什么?其实他们是 Vue 对一些函数的简写,比如说 _c 对应的是 createElement 这个函数。没关系,我们把它用 VNode 的形式写出来就会明白了,这个对接上一章写的 VNode 函数。
首先是第一层 div 节点。
render () {
    return isShow ? (new VNode('div', {
        'staticClass': 'demo',
        'class': c
    }, [ /*这里还有子节点*/ ])) : createEmptyVNode();
}
然后我们在 children 中加上第二层 span 及其子文本节点节点。
/* 渲染v-for列表 */
function renderList (val, render) {
    let ret = new Array(val.length);
    for (i = 0, l = val.length; i < l; i++) {
        ret[i] = render(val[i], i);
    }
}

render () {
    return isShow ? (new VNode('div', {
        'staticClass': 'demo',
        'class': c
    },
        /* begin */
        renderList(sz, (item) => {
            return new VNode('span', {}, [
                createTextVNode(item);
            ]);
        })
        /* end */
    )) : createEmptyVNode();
}
那我们如何来实现一个 generate 呢?
genIf
首先实现一个处理 if 条件的 genIf 函数。
function genIf (el) {
    el.ifProcessed = true;
    if (!el.ifConditions.length) {
        return '_e()';
    }
    return `(${el.ifConditions[0].exp})?${genElement(el.ifConditions[0].block)}: _e()`
}
genFor
然后是处理 for 循环的函数。
function genFor (el) {
    el.forProcessed = true;

    const exp = el.for;
    const alias = el.alias;
    const iterator1 = el.iterator1 ? `,${el.iterator1}` : '';
    const iterator2 = el.iterator2 ? `,${el.iterator2}` : '';

    return `_l((${exp}),` +
        `function(${alias}${iterator1}${iterator2}){` +
        `return ${genElement(el)}` +
    '})';
}
genText
处理文本节点的函数。
function genText (el) {
  return `_v(${el.type === 2
    ? el.expression // no need for () because already wrapped in _s()
    : JSON.stringify(el.text)
  })`
}
genElement
接下来实现一下 genElement,这是一个处理节点的函数,因为它依赖 genChildren 以及genNode ,所以这三个函数放在一起讲。
genElement会根据当前节点是否有 if 或者 for 标记然后判断是否要用 genIf 或者 genFor 处理,否则通过 genChildren 处理子节点,同时得到 staticClass、class 等属性。
genChildren 比较简单,遍历所有子节点,通过 genNode 处理后用,隔开拼接成字符串。
genNode 则是根据 type 来判断该节点是用文本节点 genText 还是标签节点 genElement 来处理。
function genNode (el) {
    if (el.type === 1) {
        return genElement(el);
    } else {
        return genText(el);
    }
}

function genChildren (el) {
    const children = el.children;

    if (children && children.length > 0) {
        return `${children.map(genNode).join(',')}`;
    }
}

function genElement (el) {
    if (el.if && !el.ifProcessed) {
        return genIf(el);
    } else if (el.for && !el.forProcessed) {
        return genFor(el);
    } else {
        const children = genChildren(el);
        let code;
        code = `_c('${el.tag},'{
            staticClass: ${el.attrsMap && el.attrsMap[':class']},
            class: ${el.attrsMap && el.attrsMap['class']},
        }${
            children ? `,${children}` : ''
        })`
        return code;
    }
}
generate
最后我们使用上面的函数来实现 generate,其实很简单,我们只需要将整个 AST 传入后判断是否为空,为空则返回一个 div 标签,否则通过 generate 来处理。
function generate (rootAst) {
    const code = rootAst ? genElement(rootAst) : '_c("div")'
    return {
        render: `with(this){return ${code}}`,
    }
}
经历过这些过程以后,我们已经把 template 顺利转成了 render function 了。不过这里 render function 还只是字符串形式,需要转换成可以执行的函数:
export const createCompiler = createCompilerCreator(function baseCompile (
  template: string,
  options: CompilerOptions
): CompiledResult {
  const ast = parse(template.trim(), options)
  if (options.optimize !== false) {
    optimize(ast, options)
  }
  const code = generate(ast, options)
  return {
    ast,
    render: code.render, // render 字符串
    staticRenderFns: code.staticRenderFns
  }
})
再把上面生成的render字符串传入下面的函数:
function createFunction (code, errors) {
  try {
    return new Function(code)
  } catch (err) {
    errors.push({ err, code })
    return noop
  }
}

res.render = createFunction(compiled.render) // 这里的 compiled.render 就是上面生成的 render 字符串

...
Vue.prototype._render = function () {
  vnode = render.call(vm._renderProxy, vm.$createElement) // 最后执行该函数生成 vnode
}
...
接下来我们将介绍 patch 的过程,来看一下具体 VNode 节点如何进行差异的比对。
patch 差异更新
数据更新视图
之前讲到,在对 model 进行操作对时候,会触发对应 Dep 中的 Watcher 对象。Watcher 对象会调用对应的 update 来修改视图。最终是将新产生的 VNode 节点与老 VNode 进行一个 patch 的过程,比对得出「差异」,最终将这些「差异」更新到视图上。
这一章就来介绍一下这个 patch 的过程,因为 patch 过程本身比较复杂,这一章的内容会比较多,但是不要害怕,我们逐块代码去看,一定可以理解。
跨平台
因为使用了 Virtual DOM 的原因,Vue 具有了跨平台的能力,Virtual DOM 终归只是一些 JavaScript 对象罢了,那么最终是如何调用不同平台的 API 的呢?
这就需要依赖一层适配层了,将不同平台的 API 封装在内,以同样的接口对外提供。
const nodeOps = {
    setTextContent (text) {
        if (platform === 'weex') {
            node.parentNode.setAttr('value', text);
        } else if (platform === 'web') {
            node.textContent = text;
        }
    },
    parentNode () {
        //......
    },
    removeChild () {
        //......
    },
    nextSibling () {
        //......
    },
    insertBefore () {
        //......
    }
}
举个例子,现在我们有上述一个 nodeOps 对象做适配,根据 platform 区分不同平台来执行当前平台对应的API,而对外则是提供了一致的接口,供 Virtual DOM 来调用。
一些API
接下来我们来介绍其他的一些 API,这些API在下面 patch 的过程中会被用到,他们最终都会调用 nodeOps 中的相应函数来操作平台。
insert 用来在 parent 这个父节点下插入一个子节点,如果指定了 ref 则插入到 ref 这个子节点前面。
function insert (parent, elm, ref) {
    if (parent) {
        if (ref) {
            if (ref.parentNode === parent) {
                nodeOps.insertBefore(parent, elm, ref);
            }
        } else {
            nodeOps.appendChild(parent, elm)
        }
    }
}
createElm 用来新建一个节点, tag 存在创建一个标签节点,否则创建一个文本节点。
function createElm (vnode, parentElm, refElm) {
    if (vnode.tag) {
        insert(parentElm, nodeOps.createElement(vnode.tag), refElm);
    } else {
        insert(parentElm, nodeOps.createTextNode(vnode.text), refElm);
    }
}
addVnodes 用来批量调用 createElm 新建节点。
function addVnodes (parentElm, refElm, vnodes, startIdx, endIdx) {
    for (; startIdx <= endIdx; ++startIdx) {
        createElm(vnodes[startIdx], parentElm, refElm);
    }
}
removeNode 用来移除一个节点。
function removeNode (el) {
    const parent = nodeOps.parentNode(el);
    if (parent) {
        nodeOps.removeChild(parent, el);
    }
}
removeVnodes 会批量调用 removeNode 移除节点。
function removeVnodes (parentElm, vnodes, startIdx, endIdx) {
    for (; startIdx <= endIdx; ++startIdx) {
        const ch = vnodes[startIdx]
        if (ch) {
            removeNode(ch.elm);
        }
    }
}
patch
首先说一下 patch 的核心 diff 算法,我们用 diff 算法可以比对出两颗树的「差异」,我们来看一下,假设我们现在有如下两颗树,它们分别是新老 VNode 节点,这时候到了 patch 的过程,我们需要将他们进行比对。
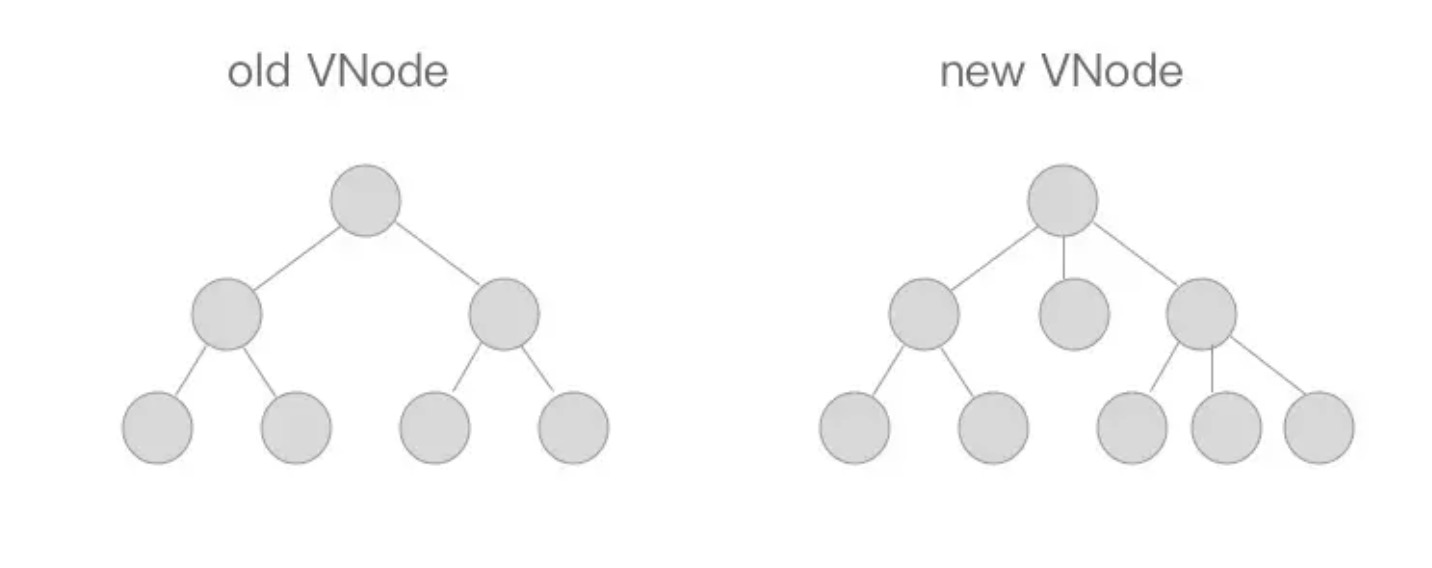
diff 算法是通过同层的树节点进行比较而非对树进行逐层搜索遍历的方式,所以时间复杂度只有 O(n),是一种相当高效的算法,如下图。
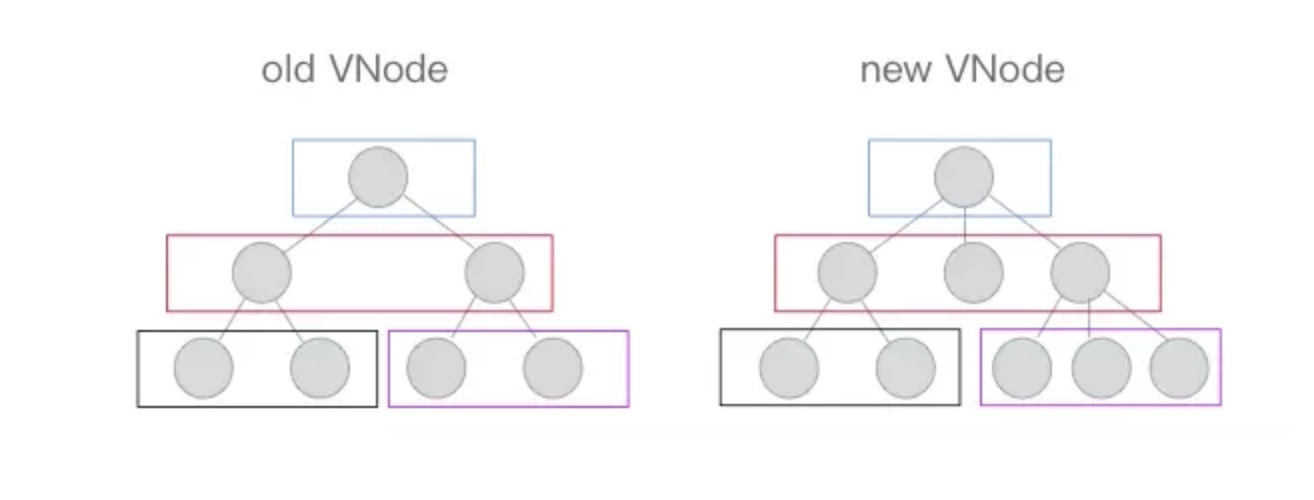
这张图中的相同颜色的方块中的节点会进行比对,比对得到「差异」后将这些「差异」更新到视图上。因为只进行同层级的比对,所以十分高效。
patch 的过程相当复杂,我们先用简单的代码来看一下。
function patch (oldVnode, vnode, parentElm) {
    if (!oldVnode) {
        addVnodes(parentElm, null, vnode, 0, vnode.length - 1);
    } else if (!vnode) {
        removeVnodes(parentElm, oldVnode, 0, oldVnode.length - 1);
    } else {
        if (sameVnode(oldVNode, vnode)) {
            patchVnode(oldVNode, vnode);
        } else {
            removeVnodes(parentElm, oldVnode, 0, oldVnode.length - 1);
            addVnodes(parentElm, null, vnode, 0, vnode.length - 1);
        }
    }
}
因为 patch 的主要功能是比对两个 VNode 节点,将「差异」更新到视图上,所以入参有新老两个 VNode 以及父节点的 element 。我们来逐步捋一下逻辑, addVnodes 、 removeVnodes 等函数后面会讲。
首先在 oldVnode(老 VNode 节点)不存在的时候,相当于新的 VNode 替代原本没有的节点,所以直接用 addVnodes 将这些节点批量添加到 parentElm 上。
if (!oldVnode) {
    addVnodes(parentElm, null, vnode, 0, vnode.length - 1);
}
然后同理,在 vnode(新 VNode 节点)不存在的时候,相当于要把老的节点删除,所以直接使用 removeVnodes 进行批量的节点删除即可。
else if (!vnode) {
    removeVnodes(parentElm, oldVnode, 0, oldVnode.length - 1);
}
最后一种情况,当 oldVNode 与 vnode 都存在的时候,需要判断它们是否属于 sameVnode(相同的节点)。如果是则进行patchVnode(比对 VNode )操作,否则删除老节点,增加新节点。
if (sameVnode(oldVNode, vnode)) {
    patchVnode(oldVNode, vnode);
} else {
    removeVnodes(parentElm, oldVnode, 0, oldVnode.length - 1);
    addVnodes(parentElm, null, vnode, 0, vnode.length - 1);
}
sameVnode
上面这些比较好理解,下面我们来看看什么情况下两个 VNode 会属于 sameVnode (相同的节点)呢?
function sameVnode () {
    return (
        a.key === b.key &&
        a.tag === b.tag &&
        a.isComment === b.isComment &&
        (!!a.data) === (!!b.data) &&
        sameInputType(a, b)
    )
}

function sameInputType (a, b) {
    if (a.tag !== 'input') return true
    let i
    const typeA = (i = a.data) && (i = i.attrs) && i.type
    const typeB = (i = b.data) && (i = i.attrs) && i.type
    return typeA === typeB
}
sameVnode 其实很简单,只有当 key、 tag、 isComment(是否为注释节点)、 data同时定义(或不定义),同时满足当标签类型为 input 的时候 type 相同(某些浏览器不支持动态修改<input>类型,所以他们被视为不同类型)即可。
patchVnode
之前patch的过程还剩下 patchVnode 这个函数没有讲,这也是最复杂的一个,我们现在来看一下。因为这个函数是在符合 sameVnode 的条件下触发的,所以会进行「比对」。
function patchVnode (oldVnode, vnode) {
    if (oldVnode === vnode) {
        return;
    }

    if (vnode.isStatic && oldVnode.isStatic && vnode.key === oldVnode.key) {
        vnode.elm = oldVnode.elm;
        vnode.componentInstance = oldVnode.componentInstance;
        return;
    }

    const elm = vnode.elm = oldVnode.elm;
    const oldCh = oldVnode.children;
    const ch = vnode.children;

    if (vnode.text) {
        nodeOps.setTextContent(elm, vnode.text);
    } else {
        if (oldCh && ch && (oldCh !== ch)) {
            updateChildren(elm, oldCh, ch);
        } else if (ch) {
            if (oldVnode.text) nodeOps.setTextContent(elm, '');
            addVnodes(elm, null, ch, 0, ch.length - 1);
        } else if (oldCh) {
            removeVnodes(elm, oldCh, 0, oldCh.length - 1)
        } else if (oldVnode.text) {
            nodeOps.setTextContent(elm, '')
        }
    }
}
首先在新老 VNode 节点相同的情况下,就不需要做任何改变了,直接 return 掉。
if (oldVnode === vnode) {
    return;
}
下面的这种情况也比较简单,在当新老 VNode 节点都是 isStatic(静态的),并且 key 相同时,只要将 componentInstance 与 elm 从老 VNode 节点“拿过来”即可。这里的 isStatic 也就是前面提到过的「编译」的时候会将静态节点标记出来,这样就可以跳过比对的过程。
if (vnode.isStatic && oldVnode.isStatic && vnode.key === oldVnode.key) {
    vnode.elm = oldVnode.elm;
    vnode.componentInstance = oldVnode.componentInstance;
    return;
}
接下来,当新 VNode 节点是文本节点的时候,直接用 setTextContent 来设置 text,这里的 nodeOps 是一个适配层,根据不同平台提供不同的操作平台 DOM 的方法,实现跨平台。
if (vnode.text) {
    nodeOps.setTextContent(elm, vnode.text);
}
当新 VNode 节点是非文本节点当时候,需要分几种情况。
- oldCh 与 ch 都存在且不相同时,使用 updateChildren 函数来更新子节点,这个后面重点讲。
- 如果只有 ch 存在的时候,如果老节点是文本节点则先将节点的文本清除,然后将 ch 批量插入插入到节点elm下。
- 同理当只有 oldch 存在时,说明需要将老节点通过 removeVnodes 全部清除。
- 最后一种情况是当只有老节点是文本节点的时候,清除其节点文本内容。
if (oldCh && ch && (oldCh !== ch)) {
    updateChildren(elm, oldCh, ch);
} else if (ch) {
    if (oldVnode.text) nodeOps.setTextContent(elm, '');
    addVnodes(elm, null, ch, 0, ch.length - 1);
} else if (oldCh) {
    removeVnodes(elm, oldCh, 0, oldCh.length - 1)
} else if (oldVnode.text) {
    nodeOps.setTextContent(elm, '')
}
updateChildren
接下来就要讲一下 updateChildren 函数了。
function updateChildren (parentElm, oldCh, newCh) {
    let oldStartIdx = 0;
    let newStartIdx = 0;
    let oldEndIdx = oldCh.length - 1;
    let oldStartVnode = oldCh[0];
    let oldEndVnode = oldCh[oldEndIdx];
    let newEndIdx = newCh.length - 1;
    let newStartVnode = newCh[0];
    let newEndVnode = newCh[newEndIdx];
    let oldKeyToIdx, idxInOld, elmToMove, refElm;

    while (oldStartIdx <= oldEndIdx && newStartIdx <= newEndIdx) {
        if (!oldStartVnode) {
            oldStartVnode = oldCh[++oldStartIdx];
        } else if (!oldEndVnode) {
            oldEndVnode = oldCh[--oldEndIdx];
        } else if (sameVnode(oldStartVnode, newStartVnode)) {
            patchVnode(oldStartVnode, newStartVnode);
            oldStartVnode = oldCh[++oldStartIdx];
            newStartVnode = newCh[++newStartIdx];
        } else if (sameVnode(oldEndVnode, newEndVnode)) {
            patchVnode(oldEndVnode, newEndVnode);
            oldEndVnode = oldCh[--oldEndIdx];
            newEndVnode = newCh[--newEndIdx];
        } else if (sameVnode(oldStartVnode, newEndVnode)) {
            patchVnode(oldStartVnode, newEndVnode);
            nodeOps.insertBefore(parentElm, oldStartVnode.elm, nodeOps.nextSibling(oldEndVnode.elm));
            oldStartVnode = oldCh[++oldStartIdx];
            newEndVnode = newCh[--newEndIdx];
        } else if (sameVnode(oldEndVnode, newStartVnode)) {
            patchVnode(oldEndVnode, newStartVnode);
            nodeOps.insertBefore(parentElm, oldEndVnode.elm, oldStartVnode.elm);
            oldEndVnode = oldCh[--oldEndIdx];
            newStartVnode = newCh[++newStartIdx];
        } else {
            let elmToMove = oldCh[idxInOld];
            if (!oldKeyToIdx) oldKeyToIdx = createKeyToOldIdx(oldCh, oldStartIdx, oldEndIdx);
            idxInOld = newStartVnode.key ? oldKeyToIdx[newStartVnode.key] : null;
            if (!idxInOld) {
                createElm(newStartVnode, parentElm, oldStartVnode.elm);
                newStartVnode = newCh[++newStartIdx];
            } else {
                elmToMove = oldCh[idxInOld];
                if (sameVnode(elmToMove, newStartVnode)) {
                    patchVnode(elmToMove, newStartVnode);
                    oldCh[idxInOld] = undefined;
                    nodeOps.insertBefore(parentElm, newStartVnode.elm, oldStartVnode.elm);
                    newStartVnode = newCh[++newStartIdx];
                } else {
                    createElm(newStartVnode, parentElm, oldStartVnode.elm);
                    newStartVnode = newCh[++newStartIdx];
                }
            }
        }
    }

    if (oldStartIdx > oldEndIdx) {
        refElm = (newCh[newEndIdx + 1]) ? newCh[newEndIdx + 1].elm : null;
        addVnodes(parentElm, refElm, newCh, newStartIdx, newEndIdx);
    } else if (newStartIdx > newEndIdx) {
        removeVnodes(parentElm, oldCh, oldStartIdx, oldEndIdx);
    }
}
看到代码那么多先不要着急,我们还是一点一点地讲解。
首先我们定义 oldStartIdx、newStartIdx、oldEndIdx 以及 newEndIdx 分别是新老两个 VNode 的两边的索引,同时 oldStartVnode、newStartVnode、oldEndVnode 以及 newEndVnode 分别指向这几个索引对应的 VNode 节点。
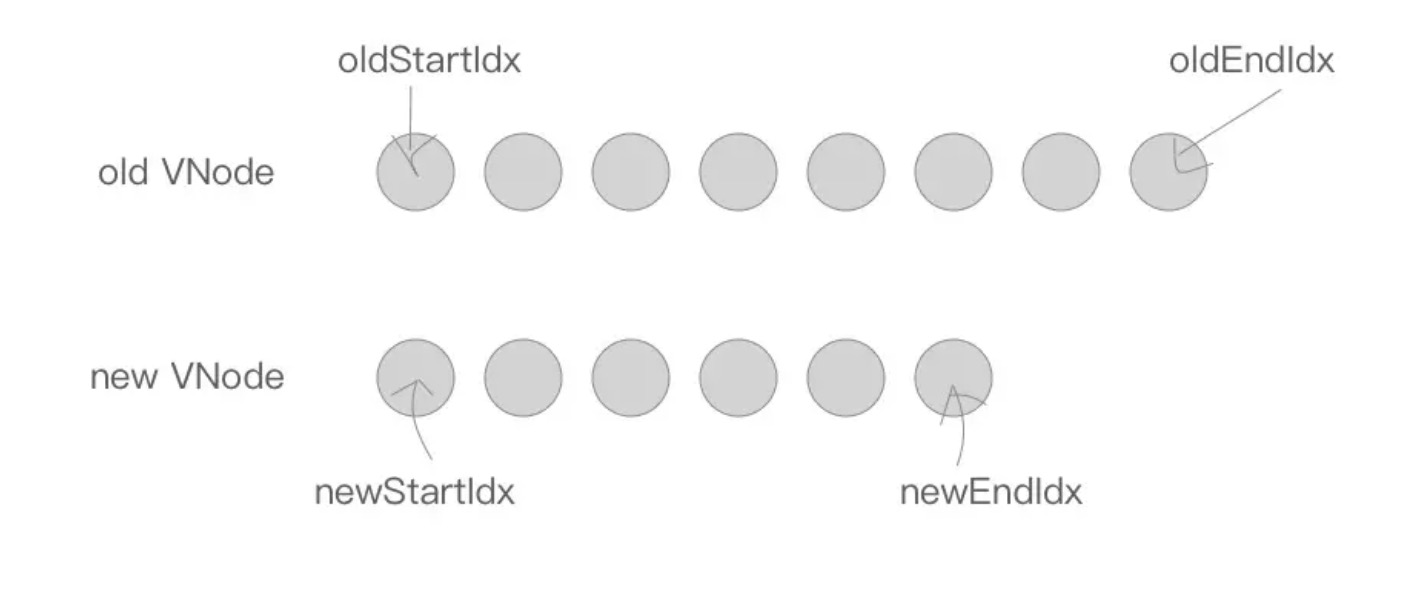
接下来是一个 while 循环,在这过程中,oldStartIdx、newStartIdx、oldEndIdx 以及 newEndIdx 会逐渐向中间靠拢。
while (oldStartIdx <= oldEndIdx && newStartIdx <= newEndIdx)
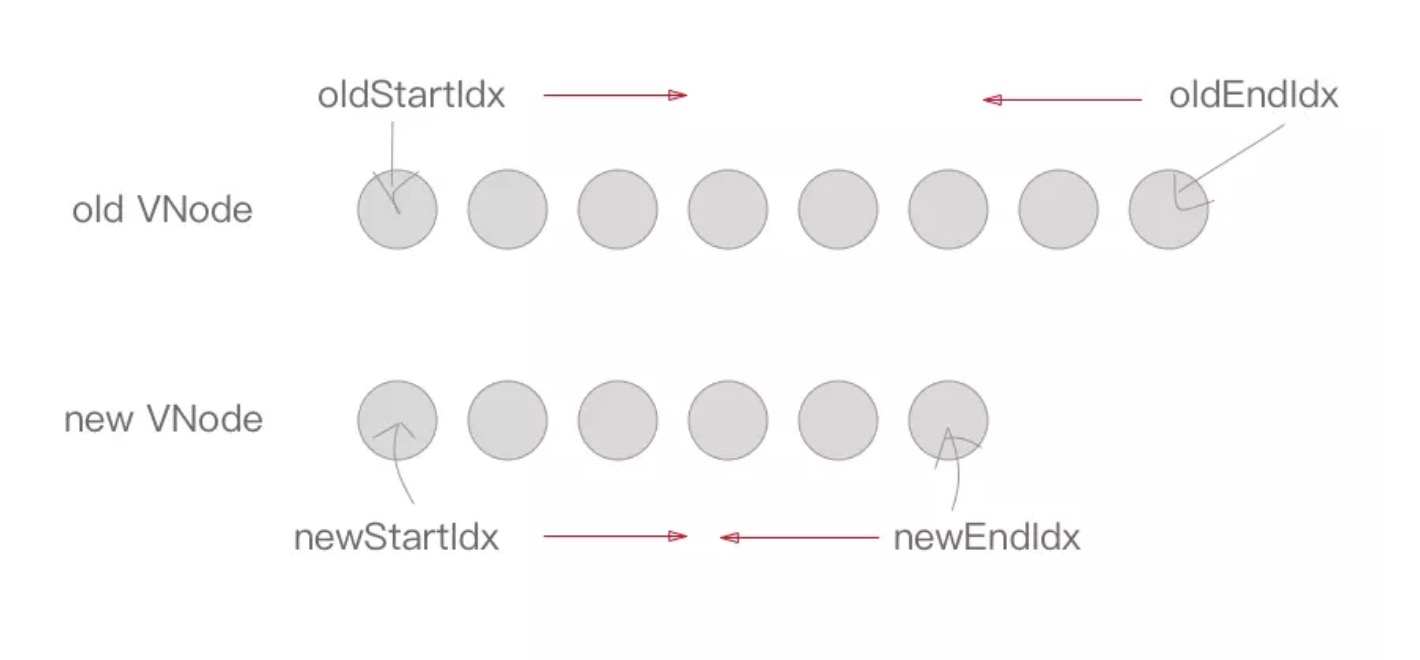
首先当 oldStartVnode 或者 oldEndVnode 不存在的时候,oldStartIdx 与 oldEndIdx 继续向中间靠拢,并更新对应的 oldStartVnode 与 oldEndVnode 的指向(注:下面讲到的 oldStartIdx、newStartIdx、oldEndIdx 以及 newEndIdx 移动都会伴随着 oldStartVnode、newStartVnode、oldEndVnode 以及 newEndVnode 的指向的变化,之后的部分只会讲 Idx 的移动)。
if (!oldStartVnode) {
    oldStartVnode = oldCh[++oldStartIdx];
} else if (!oldEndVnode) {
    oldEndVnode = oldCh[--oldEndIdx];
}
接下来这一块,是将 oldStartIdx、newStartIdx、oldEndIdx 以及 newEndIdx 两两比对的过程,一共会出现 2*2=4 种情况。
 else if (sameVnode(oldStartVnode, newStartVnode)) {
    patchVnode(oldStartVnode, newStartVnode);
    oldStartVnode = oldCh[++oldStartIdx];
    newStartVnode = newCh[++newStartIdx];
} else if (sameVnode(oldEndVnode, newEndVnode)) {
    patchVnode(oldEndVnode, newEndVnode);
    oldEndVnode = oldCh[--oldEndIdx];
    newEndVnode = newCh[--newEndIdx];
} else if (sameVnode(oldStartVnode, newEndVnode)) {
    patchVnode(oldStartVnode, newEndVnode);
    nodeOps.insertBefore(parentElm, oldStartVnode.elm, nodeOps.nextSibling(oldEndVnode.elm));
    oldStartVnode = oldCh[++oldStartIdx];
    newEndVnode = newCh[--newEndIdx];
} else if (sameVnode(oldEndVnode, newStartVnode)) {
    patchVnode(oldEndVnode, newStartVnode);
    nodeOps.insertBefore(parentElm, oldEndVnode.elm, oldStartVnode.elm);
    oldEndVnode = oldCh[--oldEndIdx];
    newStartVnode = newCh[++newStartIdx];
}
首先是 oldStartVnode 与 newStartVnode 符合 sameVnode 时,说明老 VNode 节点的头部与新 VNode 节点的头部是相同的 VNode 节点,直接进行 patchVnode,同时 oldStartIdx 与 newStartIdx 向后移动一位。

其次是 oldEndVnode 与 newEndVnode 符合 sameVnode,也就是两个 VNode 的结尾是相同的 VNode,同样进行 patchVnode 操作并将 oldEndVnode 与 newEndVnode 向前移动一位。
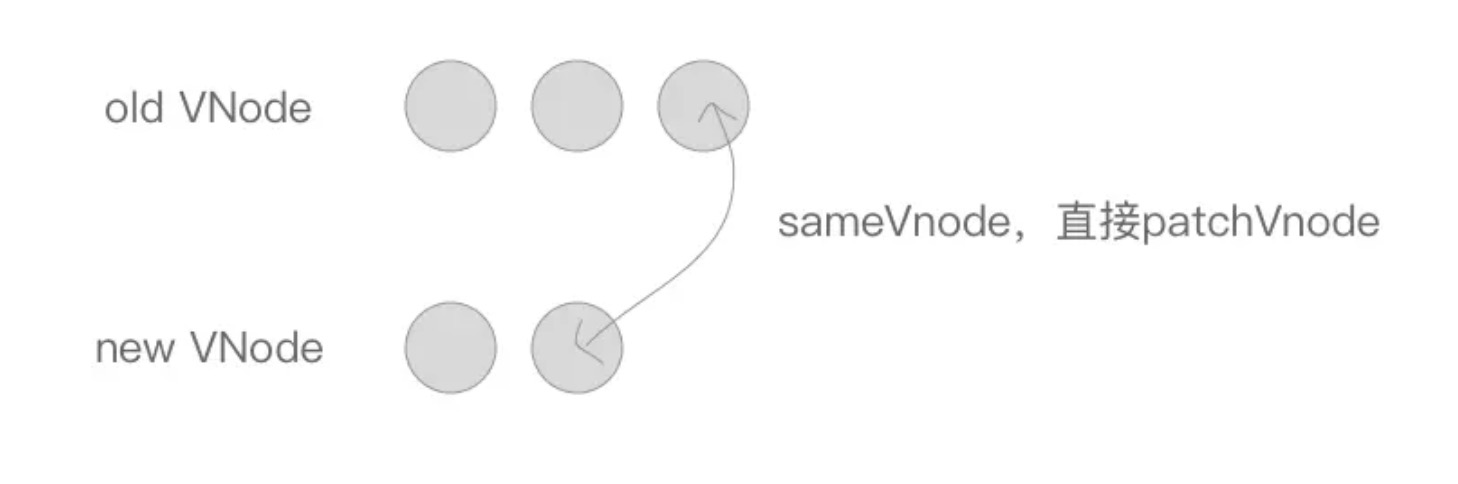
接下来是两种交叉的情况。
先是 oldStartVnode 与 newEndVnode 符合 sameVnode 的时候,也就是老 VNode 节点的头部与新 VNode 节点的尾部是同一节点的时候,将 oldStartVnode.elm 这个节点直接移动到 oldEndVnode.elm 这个节点的后面即可。然后 oldStartIdx 向后移动一位,newEndIdx 向前移动一位。
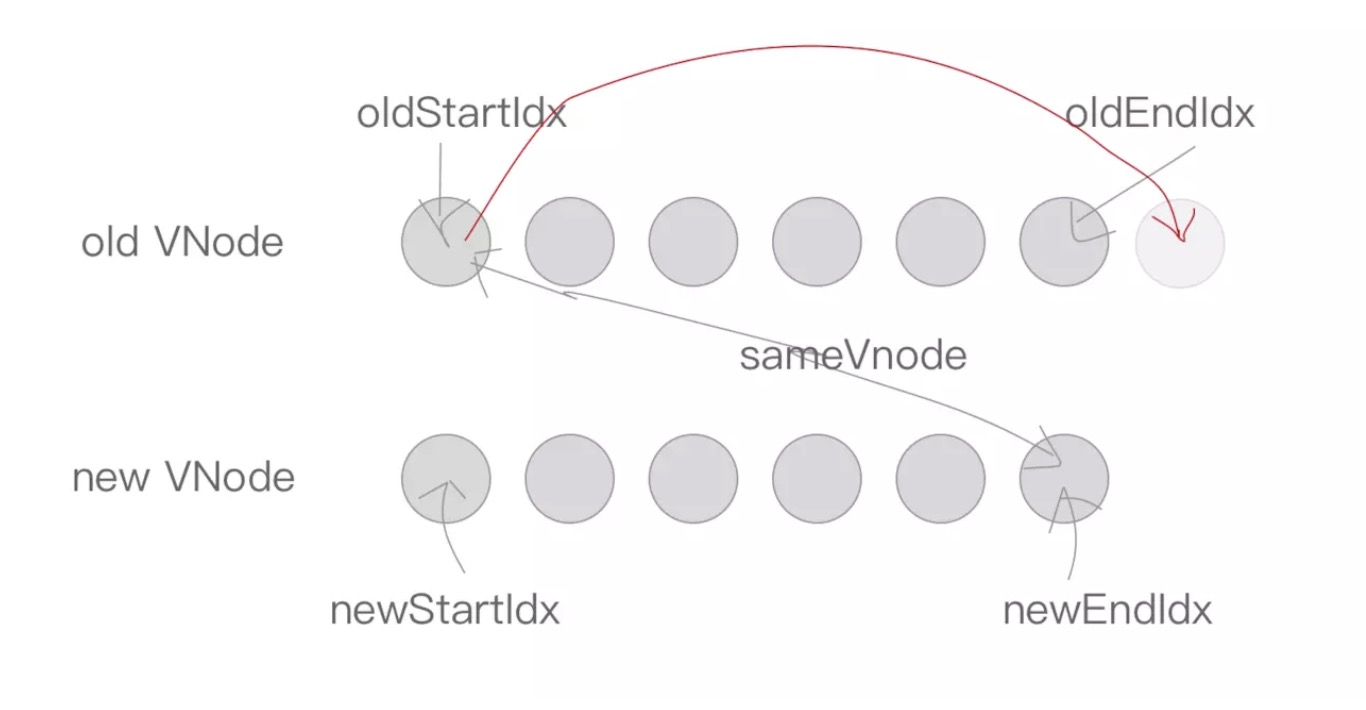
同理,oldEndVnode 与 newStartVnode 符合 sameVnode 时,也就是老 VNode 节点的尾部与新 VNode 节点的头部是同一节点的时候,将 oldEndVnode.elm 插入到 oldStartVnode.elm 前面。同样的,oldEndIdx 向前移动一位,newStartIdx 向后移动一位。
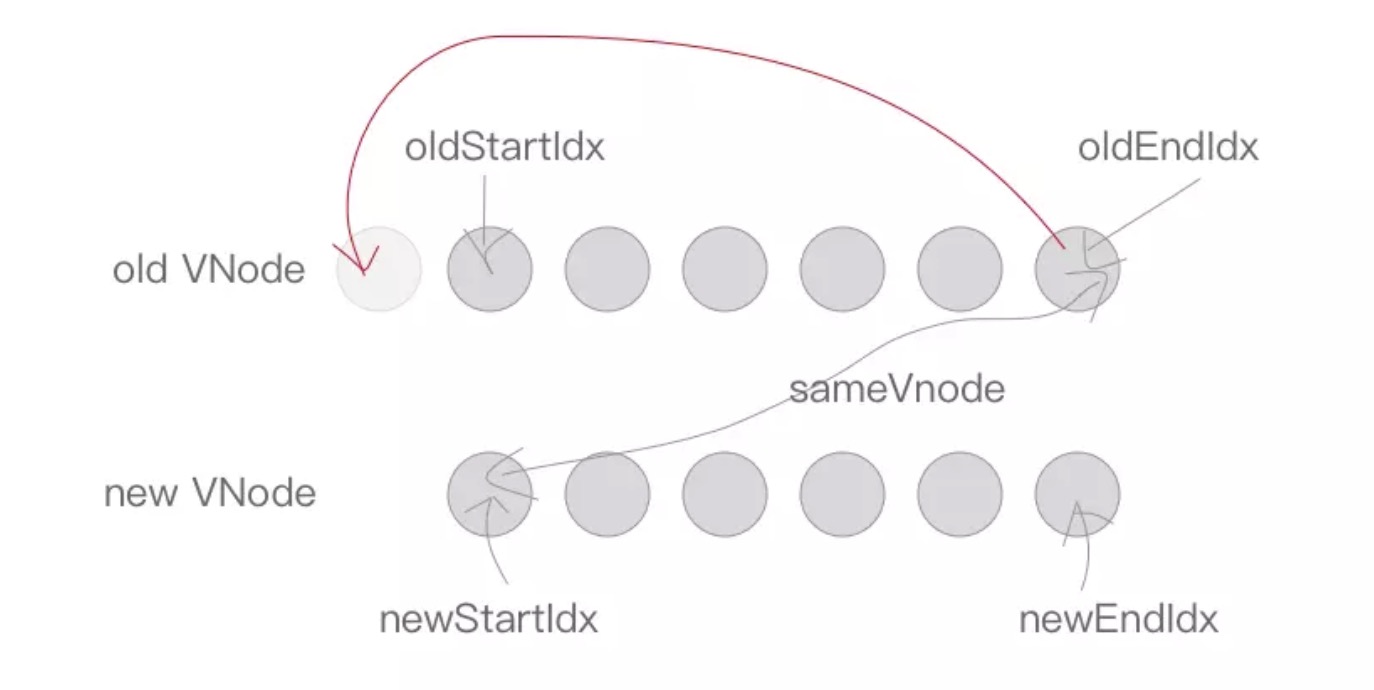
最后是当以上情况都不符合的时候,这种情况怎么处理呢?
else {
    let elmToMove = oldCh[idxInOld];
    if (!oldKeyToIdx) oldKeyToIdx = createKeyToOldIdx(oldCh, oldStartIdx, oldEndIdx);
    idxInOld = newStartVnode.key ? oldKeyToIdx[newStartVnode.key] : null;
    if (!idxInOld) {
        createElm(newStartVnode, parentElm, oldStartVnode.elm);
        newStartVnode = newCh[++newStartIdx];
    } else {
        elmToMove = oldCh[idxInOld];
        if (sameVnode(elmToMove, newStartVnode)) {
            patchVnode(elmToMove, newStartVnode);
            oldCh[idxInOld] = undefined;
            nodeOps.insertBefore(parentElm, newStartVnode.elm, oldStartVnode.elm);
            newStartVnode = newCh[++newStartIdx];
        } else {
            createElm(newStartVnode, parentElm, oldStartVnode.elm);
            newStartVnode = newCh[++newStartIdx];
        }
    }
}

function createKeyToOldIdx (children, beginIdx, endIdx) {
    let i, key
    const map = {}
    for (i = beginIdx; i <= endIdx; ++i) {
        key = children[i].key
        if (isDef(key)) map[key] = i
    }
    return map
}
createKeyToOldIdx 的作用是产生 key 与 index 索引对应的一个 map 表。比如说:
[
    {xx: xx, key: 'key0'},
    {xx: xx, key: 'key1'},
    {xx: xx, key: 'key2'}
]
在经过 createKeyToOldIdx 转化以后会变成:
{
    key0: 0,
    key1: 1,
    key2: 2
}
我们可以根据某一个 key 的值,快速地从 oldKeyToIdx(createKeyToOldIdx 的返回值)中获取相同 key 的节点的索引 idxInOld,然后找到相同的节点。
如果没有找到相同的节点,则通过 createElm 创建一个新节点,并将 newStartIdx 向后移动一位。
if (!idxInOld) {
    createElm(newStartVnode, parentElm, oldStartVnode.elm);
    newStartVnode = newCh[++newStartIdx];
}
否则如果找到了节点,同时它符合 sameVnode,则将这两个节点进行 patchVnode,将该位置的老节点赋值 undefined(之后如果还有新节点与该节点key相同可以检测出来提示已有重复的 key ),同时将 newStartVnode.elm 插入到 oldStartVnode.elm 的前面。同理,newStartIdx 往后移动一位。
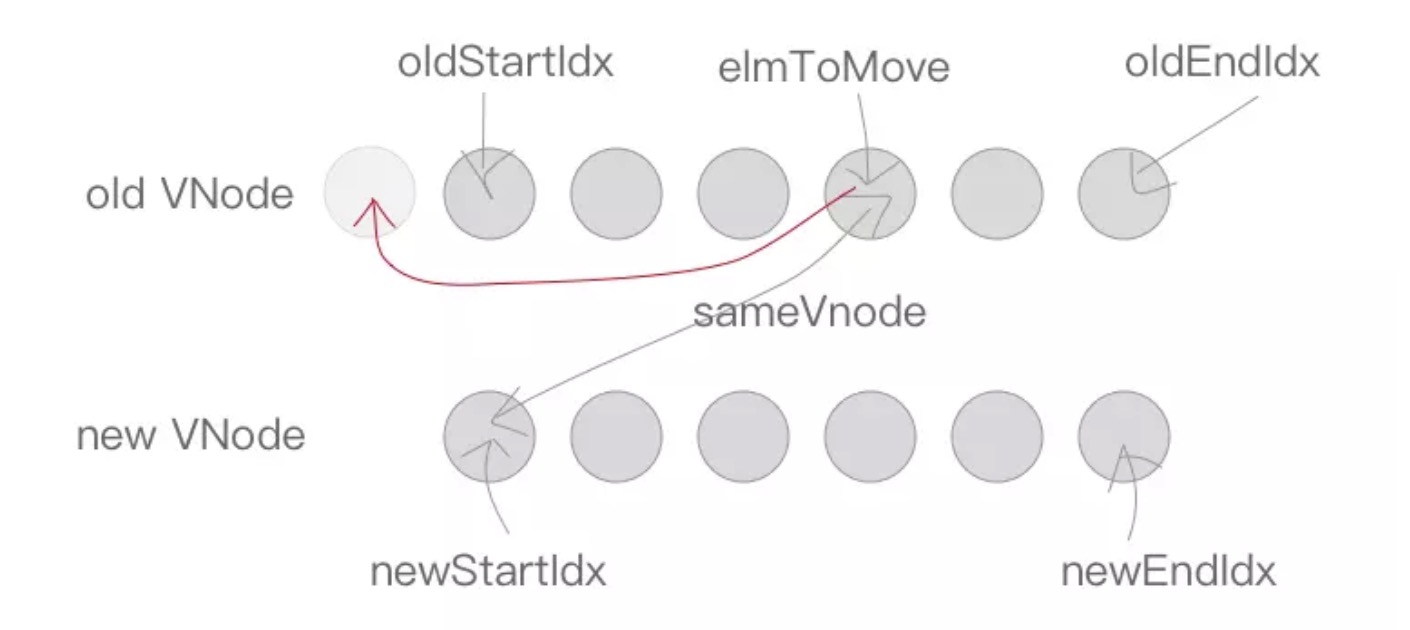
else {
    elmToMove = oldCh[idxInOld];
    if (sameVnode(elmToMove, newStartVnode)) {
        patchVnode(elmToMove, newStartVnode);
        oldCh[idxInOld] = undefined;
        nodeOps.insertBefore(parentElm, newStartVnode.elm, oldStartVnode.elm);
        newStartVnode = newCh[++newStartIdx];
    }
}
如果不符合 sameVnode,只能创建一个新节点插入到 parentElm 的子节点中,newStartIdx 往后移动一位。
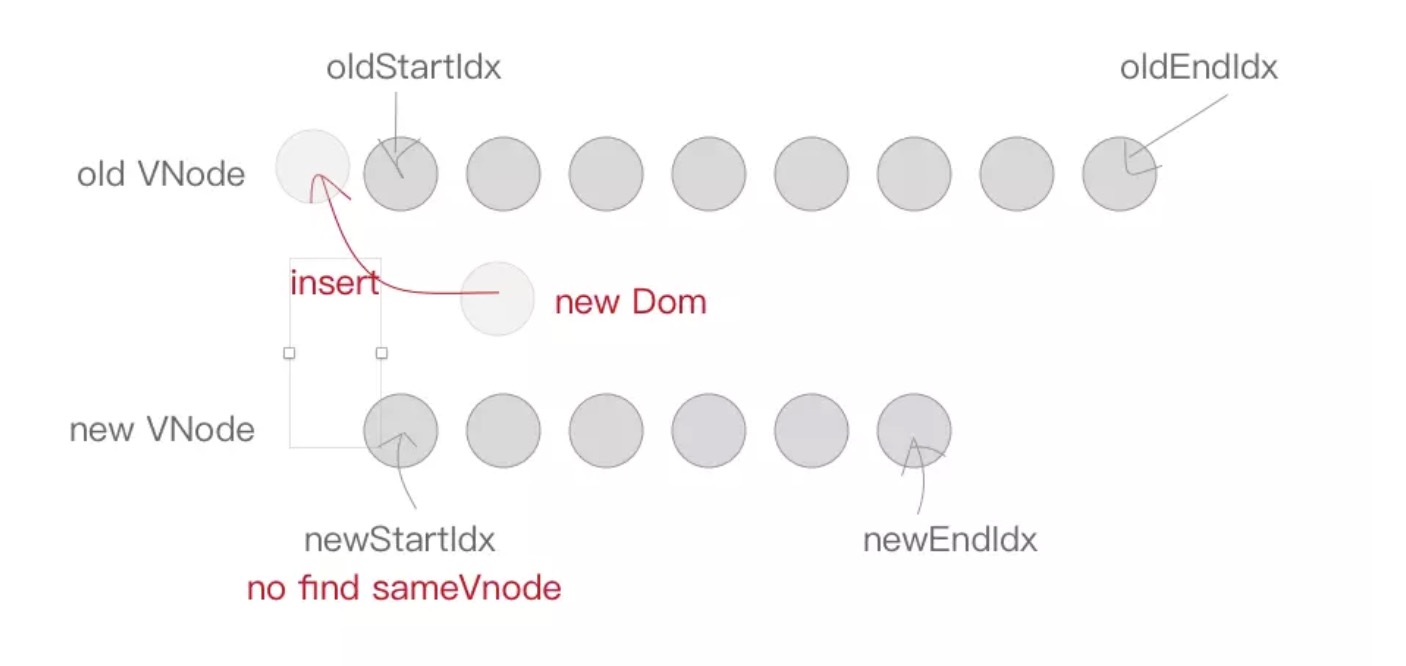
else {
    createElm(newStartVnode, parentElm, oldStartVnode.elm);
    newStartVnode = newCh[++newStartIdx];
}
最后一步就很容易啦,当 while 循环结束以后,如果 oldStartIdx > oldEndIdx,说明老节点比对完了,但是新节点还有多的,需要将新节点插入到真实 DOM 中去,调用 addVnodes 将这些节点插入即可。
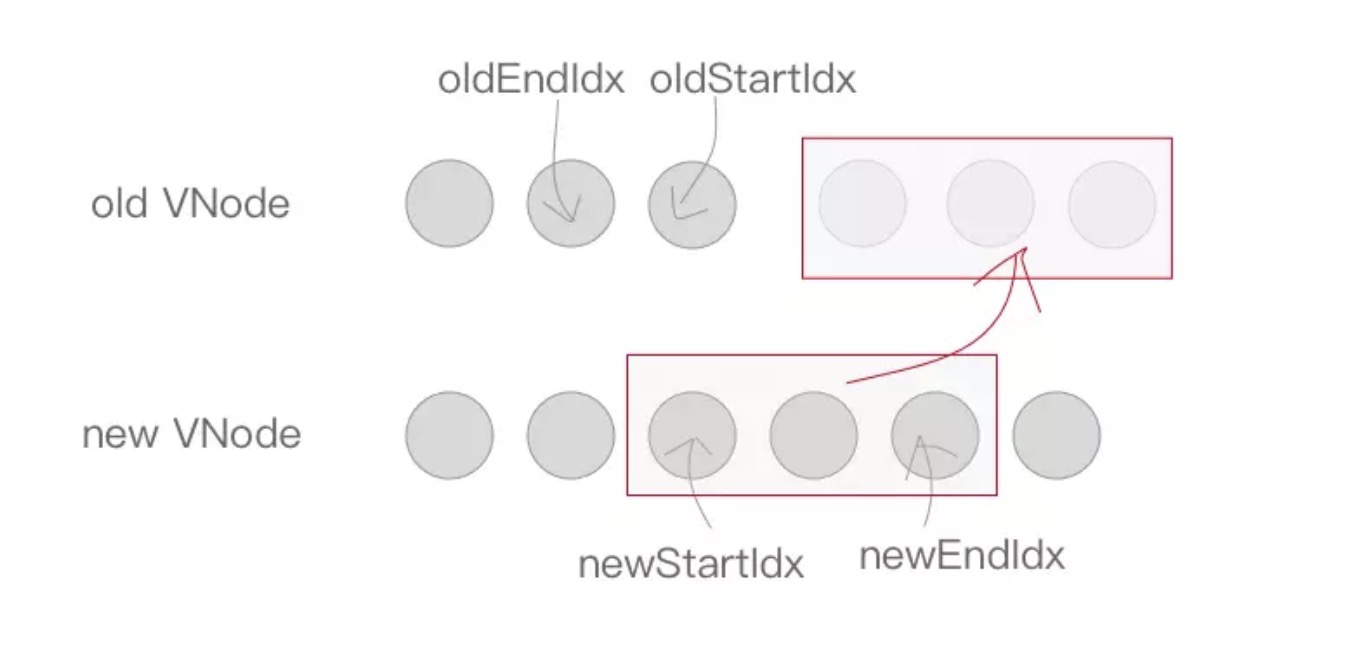
同理,如果满足 newStartIdx > newEndIdx 条件,说明新节点比对完了,老节点还有多,将这些无用的老节点通过 removeVnodes 批量删除即可。
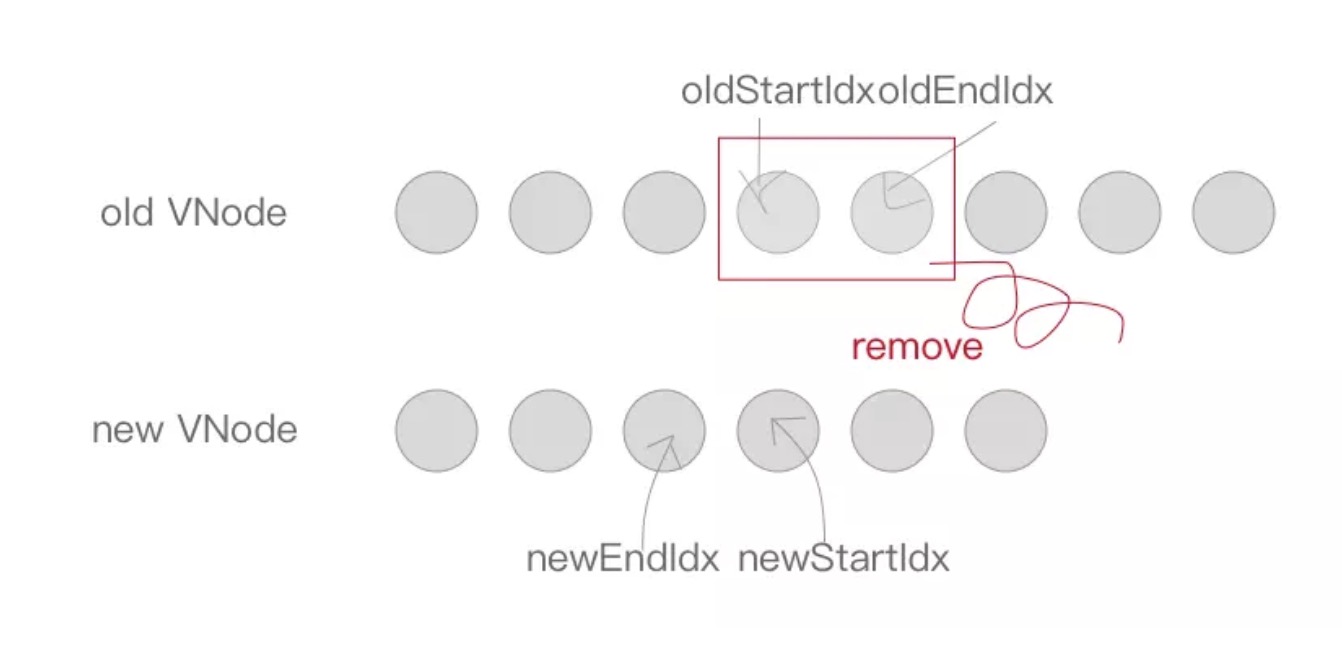
if (oldStartIdx > oldEndIdx) {
    refElm = (newCh[newEndIdx + 1]) ? newCh[newEndIdx + 1].elm : null;
    addVnodes(parentElm, refElm, newCh, newStartIdx, newEndIdx);
} else if (newStartIdx > newEndIdx) {
    removeVnodes(parentElm, oldCh, oldStartIdx, oldEndIdx);
}
总结
到这里,patch的主要功能也基本讲完了,我们发现,在本篇中,大量出现了一个key字段。经过上面的调研,其实我们已经知道Vue的diff算法中其核心是基于两个简单的假设:
- 两个相同的组件产生类似的DOM结构,不同的组件产生不同的DOM结构
- 同一层级的一组节点,他们可以通过唯一的id进行区分
基于以上这两点假设,使得虚拟DOM的Diff算法的复杂度从O(n^3)降到了O(n),当页面的数据发生变化时,Diff算法只会比较同一层级的节点:
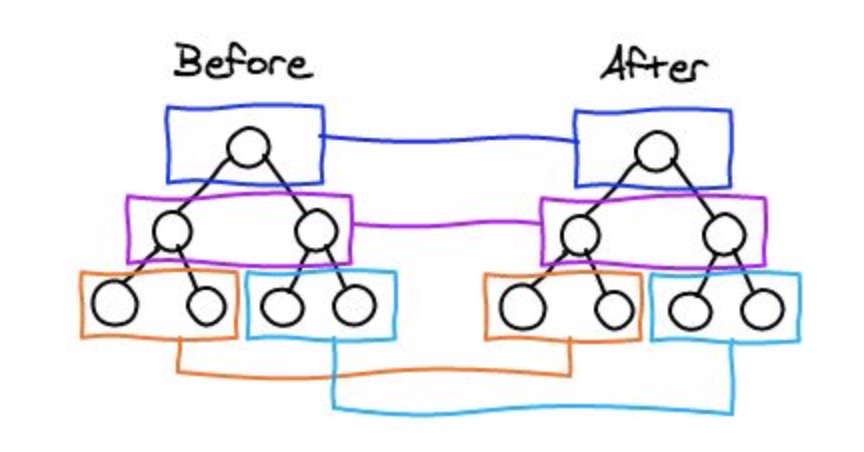
如果节点类型不同,直接干掉前面的节点,再创建并插入新的节点,不会再比较这个节点以后的子节点了。如果节点类型相同,则会重新设置该节点的属性,从而实现节点的更新。当某一层有很多相同的节点时,也就是列表节点时,Diff算法的更新过程默认情况下也是遵循以上原则。 比如一下这个情况:
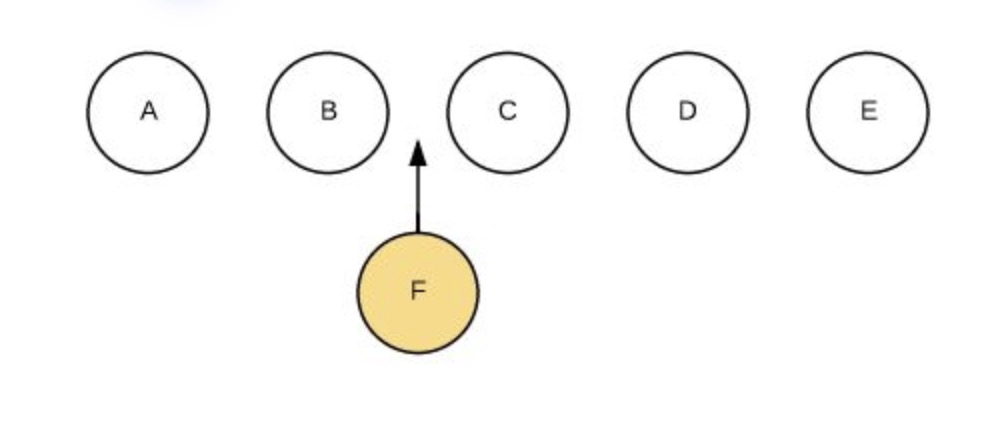
我们希望可以在B和C之间加一个F,Diff算法默认执行起来是这样的:
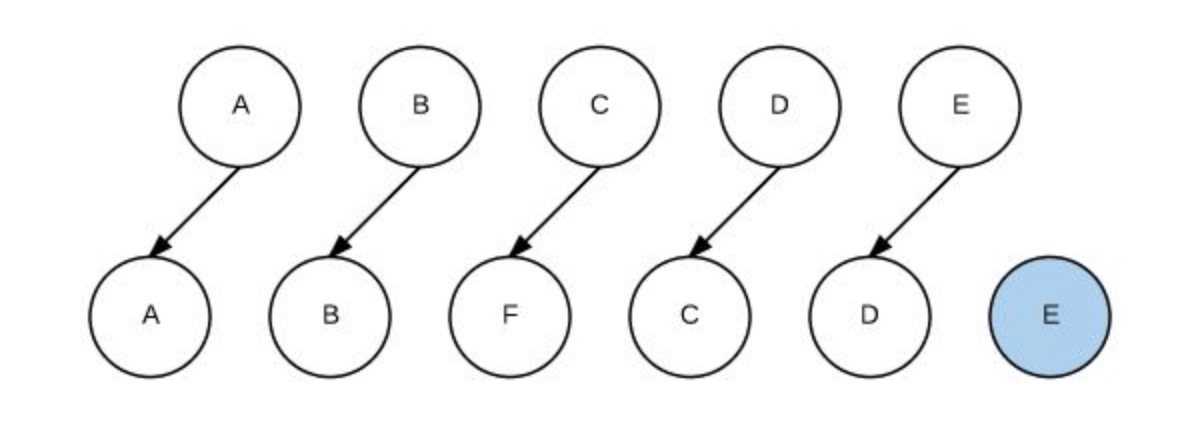
即把C更新成F,D更新成C,E更新成D,最后再插入E,是不是很没有效率? 所以我们需要使用key来给每个节点做一个唯一标识,Diff算法就可以正确的识别此节点,找到正确的位置区插入新的节点。
所以一句话,key的作用主要是为了高效的更新虚拟DOM。另外vue中在使用相同标签名元素的过渡切换时,也会使用到key属性,其目的也是为了让vue可以区分它们,否则vue只会替换其内部属性而不会触发过渡效果。